Looking back at the first year I taught woodworking two mistakes were making projects too difficult and assuming kids could use tools, Wrong. Most kids had never picked up a tool and the ones who had really didn’t know how to use them. Nailing is a perfect example. Kids emphasize pounding, which is not surprising. They have watched adults and copy them. Kids learn by imitating and when they watch an adult hammer they understand moving the hammer up and down and hitting the nail, but miss how a woodworker gets the nail in the right place, gets it started straight, keeps it going straight, and how they hold two boards together as they hammer. Here are five projects to help ease children into the craft of driving nails.
Here is a four year old pounding a nail who does a nice job:
https://www.youtube.com/edit?o=U&video_id=26H6lbOCwIE
First, set up a pounding area and have children wear eye protection. The best place for nailing is usually not a workbench, especially if it is thin enough so it bounces when a child hammers. I have see this bouncy workbench problem at certain big box stores on Saturday when they sometimes have “woodworking” or at boat shows where they have “boat building” for kids. A better place is on the floor (usually not the dirt or grass because it absorbs impact) in an out-of-the-way corner. Nailing at the workbench is distracting if there are others at the workbench, can result in flying nails or pieces of wood, and puts the child too high to swing the hammer effectively.
Kids need a hammer heavy enough to put the nail in, around 20 oz is about right. One mistake people often make is to give kids a small, light hammer, but a light hammer just won’t have the weight to drive the nail in. I over the years I noticed kids choked up on the longer hammer handles so I cut the handle down to be about 8” long and I think it makes it easier for beginners to handle.
First Lesson for Very Young Children: Making a Sign (preschool and K)
This project consists of a small board with the child’s name (or Mom or Dad) outlined in indentations made by three or four taps on a big nail. It allows young children to hold a hammer and a nail in position and practice the pounding motion.

Tools
• One nail about three inches long with a big head.
• small hammer
• Optional drill.
Materials
• Small board about 3” X 6”.
• Sandpaper.
• ¼” dowel or pencil
• Optional small piece of string or yarn to hang the sign.
Construction Print the child’s name (or Mom or Dad) on the board. The child’s job is to tap the nail three or four times every 1/4” inch or so, following the letters. Demonstrate how to do this for a part of a letter. Use the dowel or pencil for a spacer to measure the distance from one hole to the next. The result is the child’s name outlined in dots. Then have the child drill two holes in the top of the sign so it can be hung up by the string. The last step is sanding.
Second Lesson the Mom or Dad Sign
Making signs with nail lettering was one of those projects that was too complicated and didn’t work well at first. Kids liked the idea of making a nail sign, but they had difficulty keeping the nails straight, at a consistent height, and spaced satisfactorily. Often the sign was not recognizable. If I helped with the initial lettering and had children use a spacer, quality improved somewhat, but still success was not what I’d hoped. I realized a jig would ensure success, so I made jigs for the words “Mom” and “Dad”
A “Dad” sign with nail lettering
These jigs are just plywood boards I built with holes following the letters. Children use the jigs by pounding finish nails (with small heads) through the holes into their wood underneath the jig. I then pry the pattern off leaving the word outlined in nails. The holes space the nails, keep them the same height and keep them straight.

For woodworkers making the jig is straightforward. A drill press is nice to keep the holes straight. I used and 1/8” drill bit and put the holes about 1/4” apart.
Using Sign jig
1. Have the child choose a piece of wood a bit larger than the pattern.
2. Fasten the jig on top of the wood chosen for the sign by pounding two nails in opposite corners of the pattern.
3. Have the child pound a nail in the rest of the holes. All the nails should be pounded down so the heads are flush with the top of the pattern. Bent nails should not be pounded over on top of the jig or the jig can’t be removed. If a nail starts to bend, I tell kids to stop pounding and go to the next nail. They don’t always do it and after all the nails are in I’ll go back and help pull out the bent ones.
4. After the bent nails are replaced, I clamp the sign in the vise and gently pry the jig off by working around and around the edges a little at a time.

Third Lesson: Nailing into a Firewood Round
You’ll need a 20 0z hammer and a firewood round, the bigger the better, but even 6” in diameter and 6” high will work. Make sure it sits flat on the floor and doesn’t wobble every time it’s hit.
Start with 1” roofing nails (big head is easier to hit) for the first lesson. Go to 1 ¼” or 1 ½” nails as competence increases. Putting a nail in can be divided into two steps: starting it and driving it in. Hold the nail with one hand and tap it (gently but not too gently) until it will stand by itself (below).

After the nail is standing solidly, it needs to be hit harder. First, move the hand holding the nail at least 6” away from the nail (above). This seems obvious, but because beginners focus on the nail and hammer, they often forget and its why thumbs get mashed. Demonstrating this will be more effective than telling them. After the extra hand is out of the way, hit the nail hard to drive it in. The hammer should hit the nail head straight on. If it doesn’t, the nail will bend off to the side. If the nail bends, it must be straightened before pounding continues. The problem is to bring as much force as possible straight down onto the top of the nail. I tell kids, “Lift the hammer up 5 inches (the length of a pen) and then drop it but control and guide it.” It’s first about guiding the drop and later about assisting the drop.

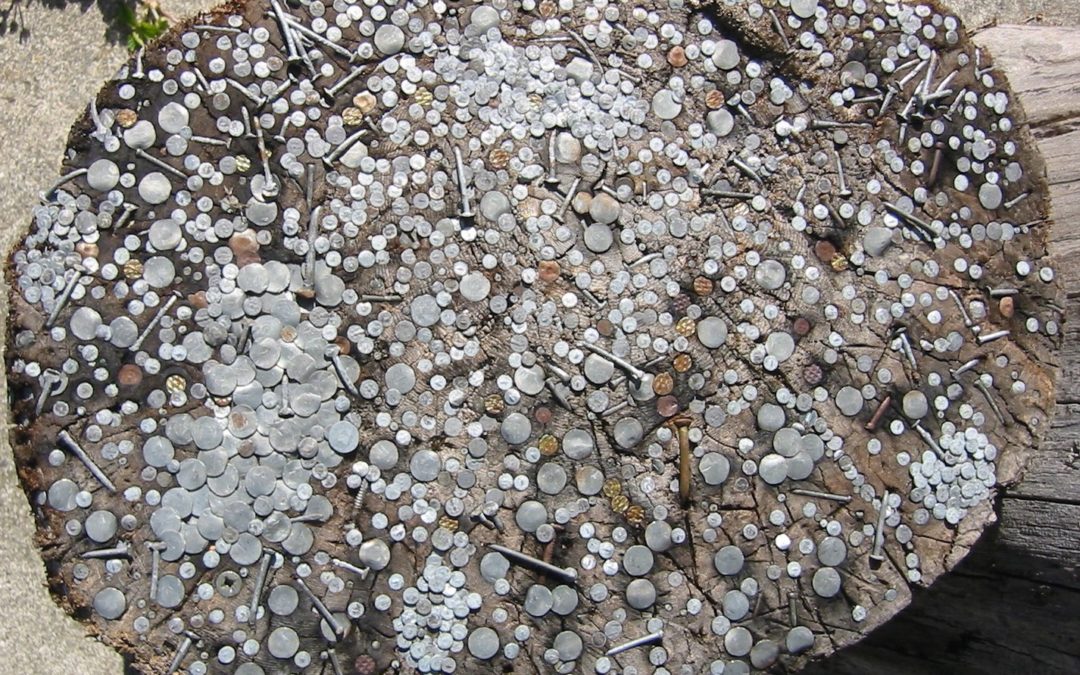
If a child has difficulty, start fifteen or twenty nails in the pounding block (not too close together) so they can drive them in without worrying about getting them started or bending them. After a child can put these in, move on to a longer nail with a smaller head. Older kids like to pound nails into the stump too (below). It’s good practice, and not uncommon for a student to pound 50 or 100 nails. One child at a time at the pounding block is a good idea. If a second child is watching make sure they have eye protection.

Fourth lesson: Where Nail Placement isn’t Critical After a child has some practice pounding nails into the stump, move her on to a project where placement isn’t too critical. The camp stool project, below, is a good example.

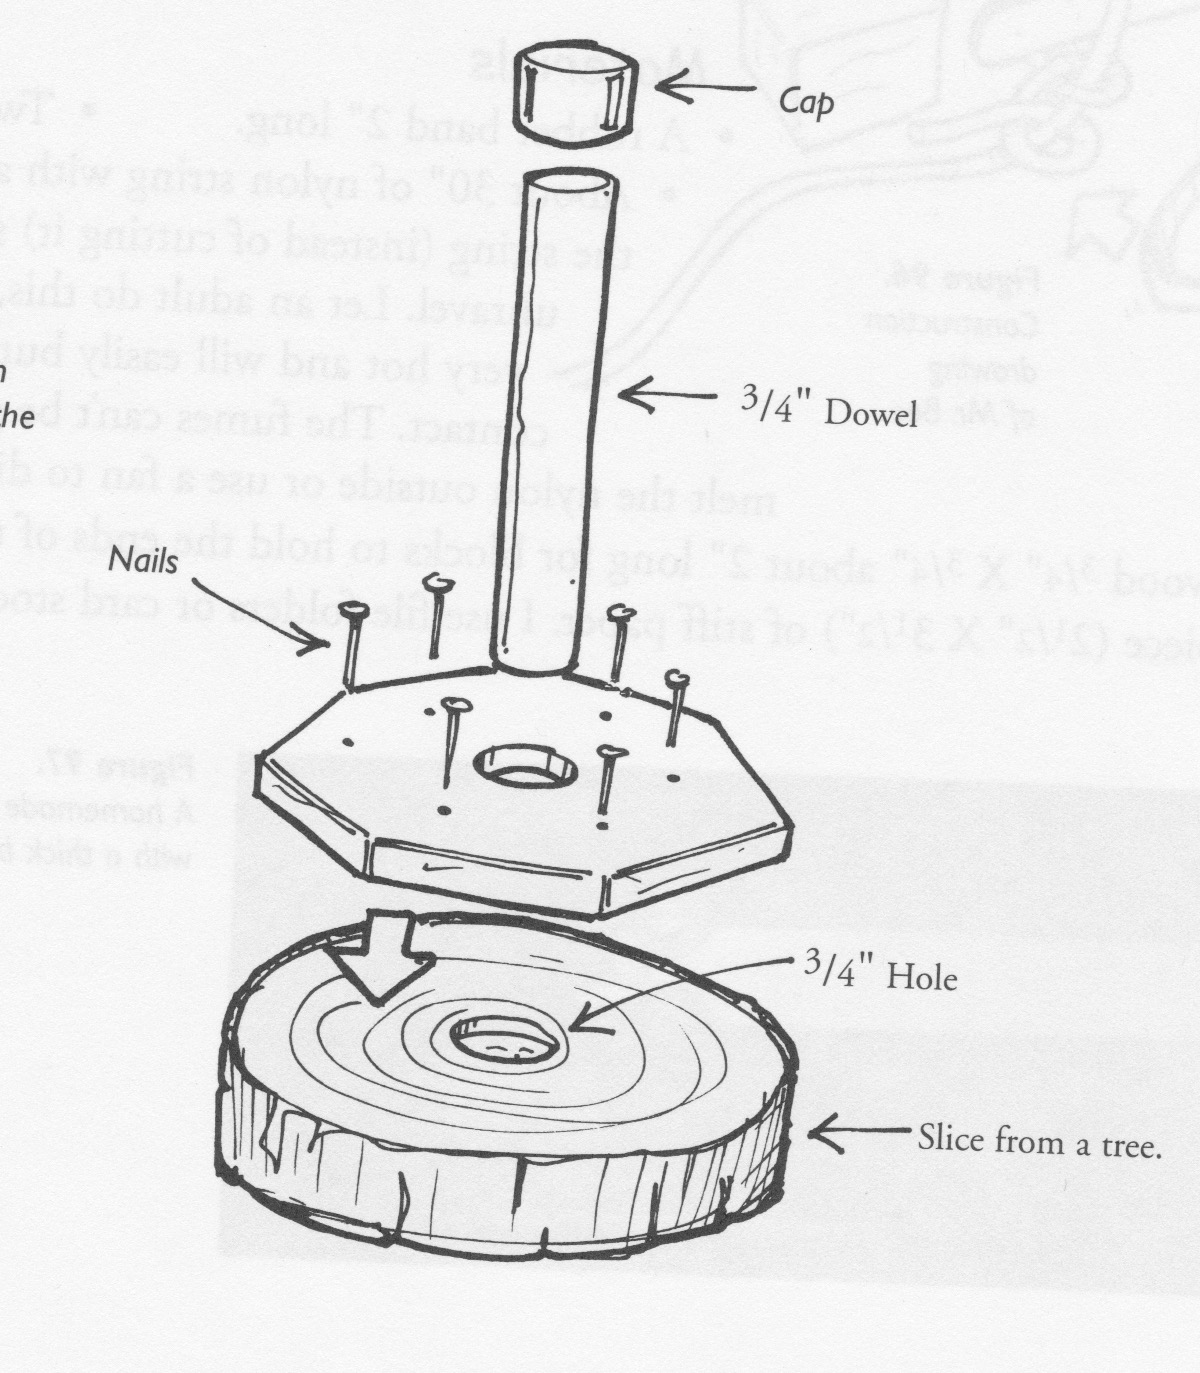
In this project, a piece of plywood (barely visible in the picture) is nailed on the bottom of a 2” thick (by 6” or 8” diameter) section of tree trunk. The nails should be sort of uniformly spaced. This also provides an opportunity to introduce a trick that makes fastening two boards together easier: pound the nails through the first board until they just stick out before even picking up the second board. Starting the nail, pounding it in, and holding the two boards in position are too many things at once. Here is how to do it:
The plywood piece is placed solidly on the pounding block (not on the round tree section) and five or six nails are put in so they are just barely poking through the plywood. Then the plywood is placed on the section of tree and the pounding is finished.
After the plywood is nailed to the the tree round finish the stool by drilling a 3/4” hole in the center of the plywood with a brace and bit or hand drill press and glue in a 3/4” dowel. The camp stool has only a single leg. Drilling the hole is hard, but rewarding work for kids. Since dowels or old broom handles aren’t always exactly 3/4” you may have to file down a flat bit so the dowel will be tight in the hole.
Fifth Lesson: Nailing Boards Together Using Pilot Holes As us woodworkers know only too well, if you try to put a nail into oak (or other hardwood), most likely it will break or bend. If you demonstrate this kids will think it’s cool and remember. Hardwoods, therefore, require a hole for the nail to follow, a pilot hole. A pilot hole should be a bit smaller than the nail. For hardwoods, there should be a pilot hole in both the board you are fastening through, and the board you’re fastening into. Depending on the type of wood nails don’t need pilot holes in softwood (usually) except near the end of a board to prevent splitting. If a nails bends, or wood splits as the fastener goes in, pilot holes should have been used. For fancy work, use pilot holes; for utilitarian jobs, try to get by without.
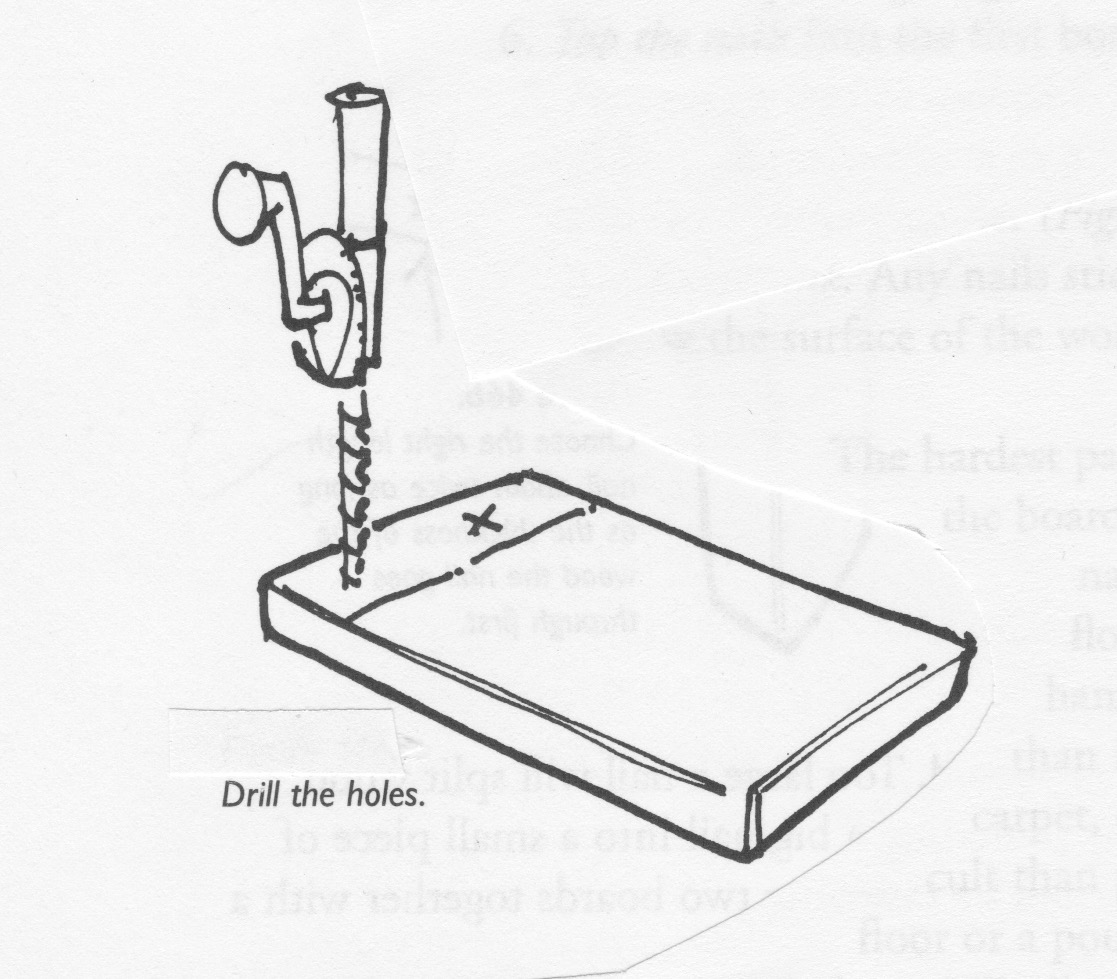
After a child can drive a nail into the stump and nail the plywood to the bottom of the camp stool (or equivalent), the next step is to fasten board corners together. This can be discouraging. Boards bounce around, nails go in crooked, and wood splits. To make this operation less frustrating and more successful, have kids lay out and drill pilot holes (through the first board) which helps the fastener go in straight and in the right place.
Here’s how to do it:
1. Choose the right length nail, approximately twice as long as the thickness of the wood the nail first goes through. The wood being nailed into should be at least 3/4” wide. Anything thinner is hard for kids to hit.
2. Fasten through the thin wood into the thick wood.
Left to their own devices, it’s common to see children try to pound a 3” nail through a 1/2” board. Too large a nail will split wood and a small nail won’t hold. Demonstrate by pounding a big nail into a small piece of wood so children can watch the wood split, and by fastening two boards together with a small nail and pulling them apart.
3. Draw a line showing where the two boards meet. With one board flat on the workbench and the other held on top of it, I say, “Hold the boards even on the outside and mark.

child marks the inside line.
I’ll demonstrate by holding two boards together while the
5.Choose the correct diameter bit (smaller than the nail) and drill pilot holes.
6. Tap the nails into the first board till they just barely stick out.

7. Position the boards and nail. The nail points should stick into the second board and keep the two pieces in position. Have the child pound the first nail while you hold the boards together.
8. Countersink. Any nails sticking out on the bottom of a project (like nailing the bottom of a box on) should be set below the surface of the wood with a nail set.
At first I try to convince kids to drill pilot holes for every nail. Later, after competence develops, pilot holes may be omitted but it’s still a good idea to mark the nail positions before pounding them. It is possible for kids to drive nails without pilot holes and if someone wants to try, that’s fine with me. I just tell him I don’t want any nails left sticking out, because someone could get poked. Usually there will be a few sticking out and I’ll demonstrate how to pound those back through with a nail set and pull them out with a hammer.
And that’s it. A little practice will go a long ways.
— Jack, woodshop4kids.com


