I did these solar experiments with kids in the early 1990’s when my kids were in school. The kids were always interested. I also made them part of my woodworking class as the “experiment of the day” for 20 years. We used the solar heated kid warmer at a Montessori preschool where I worked. There is a lot more solar with kids stuff out there now. http://www.builditsolar.com/Projects/Educational/educational.htm
Sorry there aren’t more pictures. We didn’t all carry cell phone cameras in the early 1990’s.
This post includes:
- Solar Safety
- Sundial
- Solar Absorbtion
- Solar air, water, and food heating
- Solar Hot Dog Cooker (includes plans)
- Photovoltaic electricity
- Solar Kid warmer (very popular with preschoolers)
Back in 1970, thanks to the Whole Earth Catalog, I discovered Farrington Daniel’s book Direct Use Of the Sun’s Energy, which was first published in 1964. It not only recounted solar energy history about turn-of-the-century hot water heaters and distillation plants, but told how to make solar ovens, cookers and hot water heaters. I was worried about the climate change even then so it captured my imagination. I remember running down to the thrift store to buy an umbrella in July. I lined it with aluminum foil, chopped off the handle, made a stand for a cup and made tea. I made a fresnel lens focusing collector for heating water.
It was great! As time went on I built a beer can solar collector for my shop and made a solar water heater by painting an old hot water tank black. We bought a house with big south facing windows and probably get 20-25% of our heat from the sun by just opening the curtains. If only gas had gone to $ 5.00 a gallon. I stayed at least peripherally interested in solar energy but I began to noticed my friends’ eyes beginning to glaze over any time the subject was brought up. I felt like the crazy uncle gone round the bend with impractical schemes.
One morning I woke up and realized I’d been talking about solar energy for almost 15 years and hadn’t really done much with it. I was working with kids doing science and carpentry and it occurred to me they might be interested. At least I could make a demonstration project. So I built a solar hot dog cooker. Not exactly practical, but the kids loved it. I was amazed at their reaction: no glazed eyes, no chuckles about impracticality, just amazement and wonder, my feelings still. To make a long story short, the kids’ reaction motivated me to make more equipment to demonstrate solar energy and what evolved was a 2-hour solar energy presentation for a classroom of kids.
I guarantee this demonstration will get kids excited about solar energy.
There are several directions for follow-up activities: Explanation of heat energy vs electrical energy, writing about the history of solar energy, making their own solar oven or cooker, use of math to figure out how many solar cells you would need to supply their classroom lights, study and use of low voltage electricity, or making model solar powered boats or cars, to name a few.
The following is a description of my gear in the order of presentation, but first a note of caution:
The power of the sun can start fires. Collectors should be used only under the direct supervision of a knowledgeable adult. I once left my solar hot dog cooker unattended under shed roof, protected, I thought, from the rays of the sun. The sun dropped low in the sky and snuck in under the roof and over the end of the collector. The focal point became a beam of wood six feet above the collector. I did not think this was possible but, it was, and if someone hand not been around to smell the smoke the building could have burned down.
The Experiments
1. Sundial
Clamp it to the table so it won’t move. Inside with the lights turned down move a light past the sundial to illustrated how the shadow moves as the sun moves. Introduces the concept that the sun moves through the southern sky in winter. To do: – Outside check the time when you start and kids will come back and check it again later. – Copy the face of a sundial onto paper and the kids can make their own.
2. Black absorbs light, white reflects.
Materials:
- Two pieces of copper (any metal will work), about six inches square, one painted black, the other white. If you have trouble finding copper or brass aluminum or steel will also get the point across.
- Digital thermometer is nice but not necessary To do:
When you set these in the sun, kids easily feel how much more heat black absorbs than white. Check the temperature difference with the thermometer.
3. Same as #2, but with two 2-pound coffee cans filled with water, and one painted black, the other white.
To do: -Same as #2 above
4. Hot water rises experiment
This experiment shows what happens inside the pipes of a solar water heater.
Materials:
- One clear plastic 1-gallon jar
- 4 oz artichoke hearts jar: drill two holes in the lid and glue in two pieces of drinking straws in the holes so they stick out 1/4″ above and below the lid
- food coloring
To do: Fill the big jar with cold water. Fill the small jar with hot water (solar heated of course), add food coloring to the hot water, put the lid on, and set the small jar inside the large jar. The colored water being hotter, takes up less space than the same number of cold water molecules, and rises up, through a straw, out of the little jar to the top of the cold water in the big jar. Like smoke coming out of a chimney.
5. Cardboard box heater
Materials:
- shallow cardboard box with a lid, approximately 12″ X 18″. You can make almost an box work
- Flat black paint
- Piece of plastic sheeting or thin Plexiglass, 10″ X 16″
- Duct tape
- Digital thermometer
This is a box heater. Cut a hole in the top (the box lid) almost to the edges. Use duct tape to fasten the plastic sheet over this hole. Paint the inside of the box black. Light will come through the plastic and be absorbed by the black paint.
To do:
- Stick the thermometer inside the box.
- How hot does it get? Mine approaches 200 degrees F.
- Cut a small hole in the end of the box and stick your fingers (CAREFULLY) down inside.
- Would painting the outside of the box increase the temperature inside the box?
- How could you make this heater work better?
6. A hot water heater
This is the combination of experiments 2, 4, and 5. See Daniel’s Direct Use of the Sun’s Energy, chapter 6, for details of water heater construction. Buit it solar has and incredible number of DIY projects from simple to complicate.
http://www.builditsolar.com/Projects/Educational/educational.htm
Description: Frame 2′ X 4′ box with 1″ x 4″. The back is 1/4″plywood. The inside of the box is insulated with 1/2″ foam board, painted black with high temperature flat black paint and contains a framework of copper tubing. See . The top of the box is covered with clear plastic. The top of the copper grid is connected to the top of a three-gallon plastic paint pail. The bottom of the grid is connected to the bottom of the plastic paint bucket. The water flows through the copper pipe, rising, gaining heat, into the water tank. The cooler water settles to the bottom of the tank and then flows to the bottom of the collector. To do: – Stick your hand in the water, carefully. It’s hotter than you think. – Look for the hot water where it comes out of the hose from the copper pipe. You will see it shimmer, like heat waves coming off hot pavement. – With a piece of surgical tubing and large syringe, inject some water with food coloring in it into the tank drain that feeds back to the bottom of the collector. . – Measure the temperature difference between the top and bottom of the tank. – How could this water heater be made to work better? – Comment on how inventions are often a combination two or three ideas known to most people but put together in a clever and simple way. In this case: Black absorbs heat, hot water rises and a box with a clear lid combine to become a hot water heater.
7. Solar-heated kid warmer
I built this for those chilly days in the fall and spring. It really works and my preschool kids love it. It is just a big box heater.
Materials
- Large cardboard dryer box
- Duct tape
- Flat black paint
- 3″ X 4″ piece of Visqueen
Directions: Cut a large hole in the side of a dryer box. Cover this hole with plastic sheeting using duct tape around the edges. In the opposite side from the window cut a small door. Paint the box black and face towards the sun. To do: – Kids can hide inside this cozy space to warm up on chilly days.
8. Small solar oven (make or buy)
I got a small cardboard oven (the sun spot) for $20. There are good plans in the book Heaven’s Flame by Joseph Radabaugh. You can buy more expensive ovens from Kansas Wind Power or Real Goods.
To do: -I always make cookies (even if they are small) and put them in the oven before we start. After the cookies are finished baking, the kids can put their hands in the oven to feel the power of the sun.
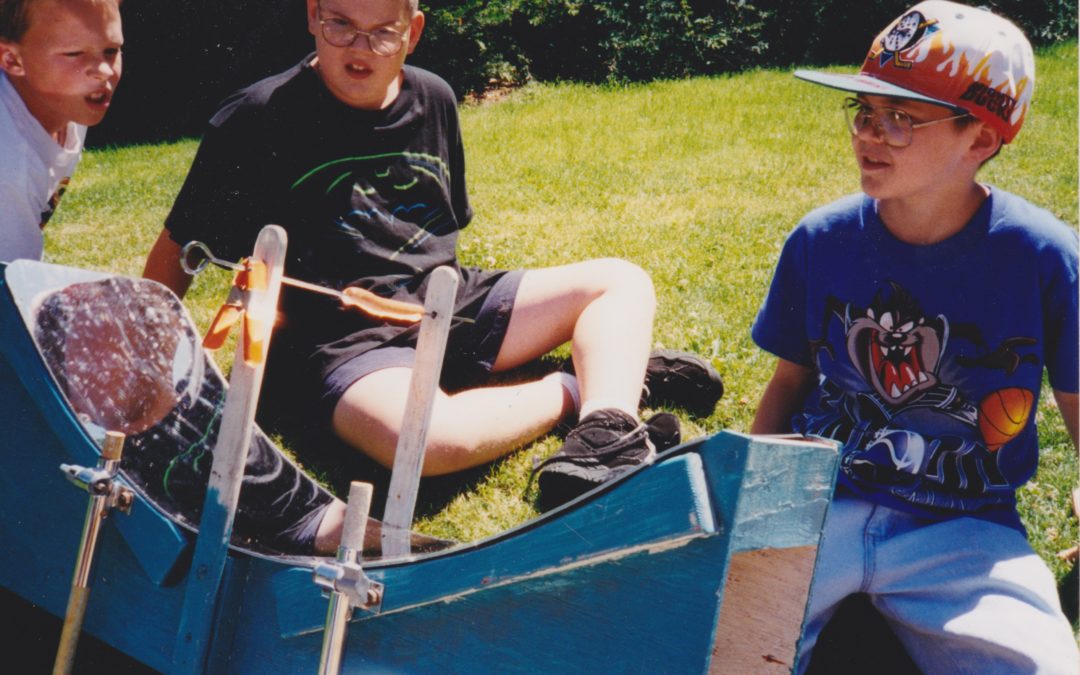
9. Solar Hot Dog cooker (see plans below)
This is a parabola shaped frame that holds a plastic mirror. The parabola focuses the sunlight on the hot dog and will burn it if the hot dog is not rotated. The plastic mirror (available at glass stores) works a lot better than aluminum foil and it is easier to clean. This rather silly device I’ve used in my summer class and it is definitely an attention getter. To do: – Have the kids two or three at a time put their hand at the focal point if they want to. It is hot. -Cut the hot dogs in half and let the kids cook their own.
10. Umbrella lined with aluminum foil (pseudo-parabolic reflector)
Materials:
- old umbrella
- Aluminum foil
- metal cup painted black
- bailing wire
Pliers
Cut off the handle of t he umbrella at the focal point and make a wire stand to hold a black cup. Mine took about 15 minutes to heat a cup of water. CAREFULLY put your hand quickly in and out of the focal point to feel the heat. Heat water for tea or hot chocolate
11. Fresnel lens cooker
The power of the sun can start fires. Collectors should be used only under the direct supervision of a knowledgeable adult. I once left my solar hot dog cooker unattended under shed roof, protected, I thought, from the rays of the sun. The sun dropped low in the sky and snuck in under the roof and over the end of the collector. The focal point became a beam of wood six feet above the collector. I did not think this was possible but, it was, and if someone hand not been around to smell the smoke the building could have burned down.
Materials:
- 1 X 6 Lumber
- Approximately 18 square feet of plastic mirror
- a stand to hold the cooking pot
- a Pan painted black
I made this from VITA plans. It is about 4′ in diameter and has four steps, each 6 1/2″ wide, aimed at the focal point. It heats a quart of water to near boiling in 15-20 minutes. To do: – Heat water for tea or hot chocolate – cook soup or rice – Keep the collector aimed at the sun so the focal point will remain on the item being cooked
12. Solar cells
This is an old 30-watt ARCO panel connected through a volt and ammeter to a rubber bladed 2-speed fan. To do: – This is a good demonstration to teach that blocking the sun blocks the energy. People often stand in front of the cells and ask why they don’t work. – I had a set of Builder Boards (https://www.youtube.com/watch?v=jKvfMxHUtS0) and let the kids build a house and then set up “air conditioning” using a small fan with rubber blades. – Hook up another electrical device, a pump, motor or lights.
13. A race against solar cells, using an old war surplus hand crank generator
This machine will put out about 50 watts, but it is hard to keep up for long. To Do: -Kids crank to see how many watts they can produce and compare their output to the output of the solar cells.
14. Books, magazines and plans
- Direct use of the Sun’s Energy
- Heaven’s Flame
- The 12 Volt Bible for Boats
- Popular Science on solar cells and power plants
- Plans for a solar furnace made from beer cans
- Other miscellaneous stuff from my solar file
Here is how I made my presentation:
Set all my equipment outside in the sun in the order it is to be presented. Put cookie dough in the solar oven.
Go into the classroom with the hot dog cooker, sundial and the two copper plates. I’ll talk to them for about 5-10 minutes and try to cover the following points:
Use of solar energy is not new
Native American Pueblos
Greeks, Archimedes setting ships afire
Water distillation in South America 1890’s
Clothesline; and sun coming in a south facing window
There is a lot of power in the energy of the sun, 1000 watts/ square yard
Kinds of energy; coal, gas, hydro, and nuclear pollute, solar does not except in the manufacturing process
Will be important in the future, during their lives because of greenhouse effect
Many uses of solar energy are very simple
Based on fact black absorbs heat and white reflects it
Safety:
– Be careful of the hot water, it is hot
– The focal points are hot, test carefully
I demonstrate the use of a sundial by turning out the classroom lights and moving a light past the sundial. Kids can see the shadow move.
Outside I explain each demonstration in order, asking for questions after each one.
After we’ve worked through all the demonstrations they get 1/2 hour or so to check out things on their own.
We take the cookies out of the oven and pass them around.
Then we have our race between the solar cells and the hand crank generator. This involves a short explanation of volts X amps = watts.
Then inside for questions and answers. This is the best part and the kids never cease to amaze me with their questions and avid interest.
Home – Reviews – Purchase – About Jack – Links – FAQs – Workshops – Do It Yourself –
How to build a solar Hot Dog Cooker
(See photo at top of page)
Have you ever had a burning desire to build a solar Hot dog cooker and roast a hot dog with only the heat from the sun? Probably not. Still they are not that hard to build and I’ll guarantee you’ll be the first one on your block to have one. As a bonus, your popularity with the neighborhood kids will move up a few notches.
While anyone can build this project, you’ll need to be determined if you are not comfortable using a jig saw, hand saw, a drill, square and tape measure. It will cost about $40.00. Here is a list of the tools and materials you’ll need along with step-by-step instructions:
Materials
– 30″ X 40″ X 3/8″, or 1/2″ plywood for the cooker sides
– 30″ X 1″ X 4″ for spacers between the plywood sides
– 6′ of 1″ X 2″ for hot dog supports and cooker supports
– 6″ X 44″ X 1/8″ thick plastic mirror for the reflector surface. Available at stores that sell glass .
– 20 1 1/8″ sheet rock screws for fastening plywood sides to spacers
– 24 3/4″ X #6 screws for fastening the mirror to plywood sides
– 2 1 1/2″ X 1/4″ carriage bolts with wing nuts to hold the angle support arms.
– 18″ X 40″ cardboard to make the parabola pattern.
– paint too suit
Tools
– Tape measure
– Hand electric jig saw
– Screwdrivers
– rasp and sandpaper
– framing square
– small block plane
– good dark sun glasses to use while cooking
WARNING, A NOTE OF CAUTION: THE POWER OF THE SUN CAN START FIRES. THIS COLLECTOR SHOULD BE USED UNDER THE DIRECT SUPERVISION OF A KNOWLEDGEABLE ADULT. I once left my hot dog cooker unattended under a shed roof, protected, I thought from the rays of the sun. The sun dropped low in the sky and snuck in under the roof and over the end of the cooker. The focal point became a beam of wood six feet above the cooker. I did not think this was possible and if someone had not been around to smell the smoke the building could have burned down. A good method is to cover the cooker when it is not in use. Then it cannot possibly catch anything on fire.
INSTRUCTIONS
1. Make the two sides of the cooker first. Draw and cut out a parabola (drawing #1) on a piece of cardboard. Transfer this shape to the plywood as shown in the plywood layout drawing #2. Two parabolas make one side.
2. Cut along the parabola marked on the plywood with the jig saw. Because it is hard to cut a smooth curve with a jig saw this curve will end up a little bumpy. Smooth it out with a block plane or rasp. The more accurate the parabola the better your cooker will work.
3. Trace the finished parabola onto the 2nd cooker side. Cut out and smooth the second side the same as the first.
4. Cut five pieces of 1″ X 4″ each 5 1/4″ long and fasten these between the two cooker sides as shown in drawing #3. Be sure the ends of the spacers are square. Note: The spacer length plus two times the plywood thickness should equal the mirror width (6″). If you use thicker plywood, or found a plastic mirror wider than 6″ adjust the spacer length accordingly.
5. After the cooker sides are fastened together, fasten the mirror securely to the plywood parabola edge using the 3/4″ X #6 screws. Carefully pre-drill the Plexiglas mirror so the holes are larger than the screws so the mirror will not crack.
6. Make two upright arms to hold the hot dogs. Use a 17″ long 1″ X 2″. Sand the edges and round the corners. Fasten these in the center of the cooker sticking straight up. Use the sheet rock screws.
7. Make the two cooker support arms. Cut two 16″ 1 X 2 ‘s. Point the end and drill the adjustment holes as shown in drawing #3. Round the corners and sand the edges. fasten to the top spacers in the middle with 1/4″ carriage bolts, washers and wing nuts. These bars will support the cooker when it is tilted towards the sun.
8. A little paint and you’re done. Now for fine-tuning and how to use your collector.
Use
Take your collector outside on a bright sunny day (they don’t work on cloudy days), and aim it towards the sun. Just for fun stick your hand in the space where the hot dog would go. You will be amazed how hot it is and you’ll pull your hand out quickly.
Here is how to find the hottest spot for the hot dogs: With the collector aimed at the sun hold a piece of cardboard approximately where the hot dogs would go. Get down on the ground and look up at the bottom of the cardboard and you will see a bright spot. Move the cardboard up and down on the bright spot will get bigger or smaller. Mark the spot on the skewer holders where the bright spot is about a hot dog width wide. Drill a hole at this height in each upright. This is for the skewer.
Now you are ready for a test. Place a hot dog on the skewer between the uprights. Aim the collector at the sun and adjust the supports (if necessary) to keep the collector from falling over. The hot dog will take a while to cook, it is not as quick as a campfire. Rotate the hot dog to keep it from burning and turn the collector to follow the sun. Look up from underneath and make sure the bright spot focuses on the bottom of the hot dogs. The skewer might be a little high or low. Adjust by drilling more holes higher and/or lower. Experiment to see what works best.
Good luck, be careful, and remember solar cooked hot dogs really do taste better!
Copyright (c) 2007 Jack McKee, all rights reserved