Years ago my son’s daycare moved. At their new location there was absolutely no playground equipment. I’d seen kids have a pretty good time on those small climbing domes and thought one could be built fairly easily from electrical conduit. I went ahead and built one and brought it to the playground. The reaction from the moms and kids was amazing. They acted like I’d built the Eiffel tower. This started me down the path of building things for kids and eventually to setting kids up to build themselves. Here are directions for the marble roll and a bit about how the design evolved.
A few years back I was teaching children’s carpentry and science and a friend lent me a small wooden marble roll to use in class. It consisted of two upright 1 X 4’s connected by sloping, grooved troughs. The marbles rolled down the troughs, reversing direction in a zigzag fashion, to the bottom. The kids loved it! They would roll one marble down by itself, then two or three, then a whole handful. Over and over and over again. They used it so much it began to bother me. What could they possibly be learning?
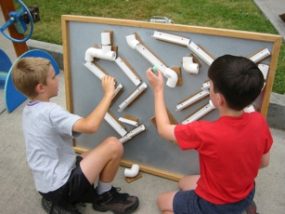
Another friend mentioned that the Museum of Science and industry in Vancouver, B.C. hand a giant velcro ball roll. I went to take a look and discovered a large wall covered with velcro. Beside the wall was a box of small troughs made from plastic plumbing pipe split lengthwise. Each trough was fastened to a velcro backed L-bracket. The troughs could then be placed anywhere on the velcro wall. By moving the troughs around, an infinite number of paths could be made. Children could design and then build their own marble roll.
I made a scaled down version with a 3’ X 5’ sheet of velcro. It worked fine at first but gradually the velcro sheet wore out and the troughs would fall off. What about using magnets instead of velcro? I replaced the big velcro sheet with a piece of sheet metal and the velcro on the back of the troughs with sheet magnet. This worked great and still works after ten years.
Children learn from what the adults around them do. If adults make things then children learn interesting, useful and even sometimes beautiful things can be made by people, not just purchased. The Magnetic marble roll is such a project. Kids can help with construction sanding, drilling holes, and fastening the troughs to the backing boards. Best of all, from an adults point of view, once finished, the marble roll requires practically no supervision. You will not believe how much fun and learning take place. My admittedly biased opinion is that every school and children’s museum should have a magnetic marble roll.
TOOLS
• An electric drill, battery powered is fine. A hand drill will work.
• Drill bit: for the 12-32 1/2” bolts and for countersinking the bolt heads. The bit which drills the holes and countersinks and the same time make things easier.
• Screwdriver bit for drill
• Screw driver to match the bolt heads.
• A vice to hold wood while cutting is nice but not absolutely necessary.
• Hand saw. A bands saw will make cutting the pipe faster.
• Metal file for filing the bolt ends smooth
MATERIALS
The backing
• A piece of galvanized sheet metal about 3’ X 4” and a 3’ X 4’ piece of 3/8” plywood for backing the sheet metal. Because I really liked the idea of recycling, I also tried an old refrigerator door. It turn out the doors usually have a thin plastic or vinyl coating which makes the magnets not stick quite so well. It works, just not so well. Perhaps a little more magnet surface would compensate. Also, I could never find a paint hardy enough to hold up to the constant rubbing of the troughs so the door became all marked up from the constant rubbing of the magnets.
• 1 X 2, about 14’, for trim to go around the edge of the plywood and cover up the galvanized metal edge which could be sharp.
• 1/2” ring nails (I used bronze boat nails) to fasten the sheet metal to the plywood board.
• short sheet rock screws (16 or so) to fasten through the back of the plywood, through the sheet metal and into the trim.
• a 1 X 6 about 3 feet long (maybe a bit shorter), a 3” door hinge, and a 2’ piece of thin rope. These will be for a stand to keep the marble roll standing up.
The balls, pipe, troughs
• First off, although I call this a marble roll, the name somehow stuck, but I never have kids use marbles. Marbles tend to roll all over and have to be chased down. Porcupine balls are the best because they roll slower and stay fairly close to the marble roll. Available from Oriental Trading company.
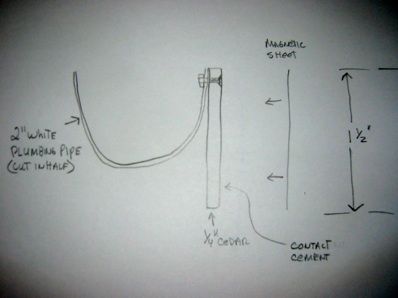
• 7’ of 2” white plastic plumbing pipe
• 2” plumbing pipe connectors: four 90˚, four 45˚, two tee’s, two sleeve connectors
• 75 1/2” 12-32 flat head bolts with nuts to fasten the pipe and pipe fittings to the boards.
• contact cement to glue the magnet sheet to the boards. The water base stuff works and isn’t so toxic.
• 3 1/2 or 4 square feet of magnetic sheets with adhesive backing cut into 1 1/2” strips. Get the heavy duty stuff as the light stuff doesn’t work so well.
• eleven feet of 1/4” thick by 1 1/2” wide soft wood such as pine or cedar, for the wood pieces to mount the pipe troughs and connectors. These need to be flat, in order to accept the magnetic sheet, light so they’re not too heavy for the magnets, and of uniform thickness so the troughs will line up when mounted on the door. I just slice some pieces off a good cedar 2 X 4. I used plywood once but it warped.
• A small box approximately 2” X 3” to catch the balls. This could be wood, cardboard, plastic or something fancier like a band saw box. It needs to be light.
• A box to hold all the pieces. I usually make a box about 5” wide by 3 1/2” high by 40” long. This box can sit right up next to the marble roll so if the marble roll is being rebuilt the troughs are more likely to be in the box and therefore less likely to get squished. A cardboard will work too, but they tend to get pushed out of the way.
• 100 grit sandpaper
CONSTRUCTION
Fasten the sheet metal to the plywood. with the 1/2” nails. Its probably easier to drill through the metal first. Just nail around the edge and then put the trim over the top of the nails fastening through the back of the plywood into the trim with the short sheet rock screws.
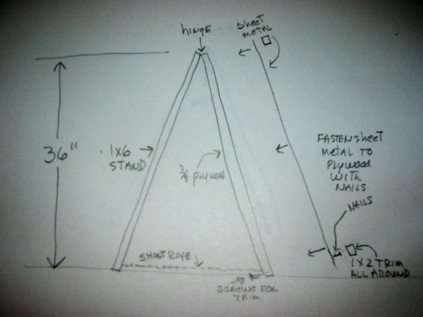
This is the stand for the metal sheet that holds the troughs
PIPE
- Cut the pipe down the center lengthwise and then it cut into lengths: four 10” lengths and eight each of 6” and 8”. Although it is hard to hold, the pipe can be cut with a fine tooth hand saw. A band saw will do the job quickly. Sand the edges of the pipe smooth.
WOOD
• Cut the 1/4” thick wood into 1 1/2” strips. Cut it into lengths to match the pipe lengths. 6” pieces for the 6” pipe, 8” lengths for the 8”, and 10’ pipe. Sand smooth.
*ASSEMBLY
• Fasten the sanded split pipe to the wood pieces with the 1/2” bolts. I put the bolt head on the wood side. You must countersink it enough to keep the bolt head below the surface of the wood so the magnet sheet can be glued flat without a bump at the bolt. The nut goes on the pipe side. File the ends of the bolts flat if they stick through the wood. Two bolts to each pipe or fitting.
• Fasten pipe connector pieces to wood backing pieces in the same manner as above. File bolt ends flat if they protrude.
• Cut and fit magnet sheets for the wood on the back of each pipe piece (troughs and connectors). Apply contact cement to the back of each wood piece and after it dries remove the protective backing from the adhesive side of the magnetic sheet and fasten magnetic sheet to back of wood pieces.
• Attach wood and magnetic sheet to the small box same as above.
TEST
Make sure all the troughs and pipe connectors fit flat on the sheet metal. Then find some kids!