This project is for third graders and up, Younger kids can do it but will need more help especially sorting out the yarn.
THE ROPE MACHINE
Rope
The Rope Machine
I first saw a picture of a rope machine in a book of projects for kids. At the time I passed it over and handed the book on to my wife, who also worked with children. She purchased a rope machine at a weaving store and found that kids loved it. They were intrigued with choosing the yarn colors and then watching them blend as the rope twisted itself together. With two kids working on it, the finished rope could be cut in half, giving each child a piece to take home. After my wife’s success, I began using the rope machine in my shop class. It was so popular, we wore it out and I decided to make one from the directions in the book.
The instructions were marginal and the machine never worked smoothly, so I set out to “do it right,” purchasing hardwood, bronze bearings, shafts, and hooks. This time the resulting machine not only didn’t work, but, as my wife pointed out, was so heavy only a bionic child could lift it. About this time, my brother dropped by and reminisced, “Dad made a rope machine for me when I was a kid. He used coat hangers for the hooks.” This made sense. While coat hangers are strong, they are also flexible in just the right place. The following instructions detail how to build this rope machine patterned after the 1950s model built by my father for his son, in the spirit of the times, from materials around the house.
This rope machine works on the same principle as rope walks of tall ship days. It’s a good activity to go along with boat building at boat shows, as well as for home, scouts, schools, and children’s museums. Everyone will be amazed as the rope winds itself together. Third graders can learn to make rope by themselves. Younger kids will need more supervision. The hardest part of making rope is keeping the yarn from getting tangled or untangling it after it’s tangled.
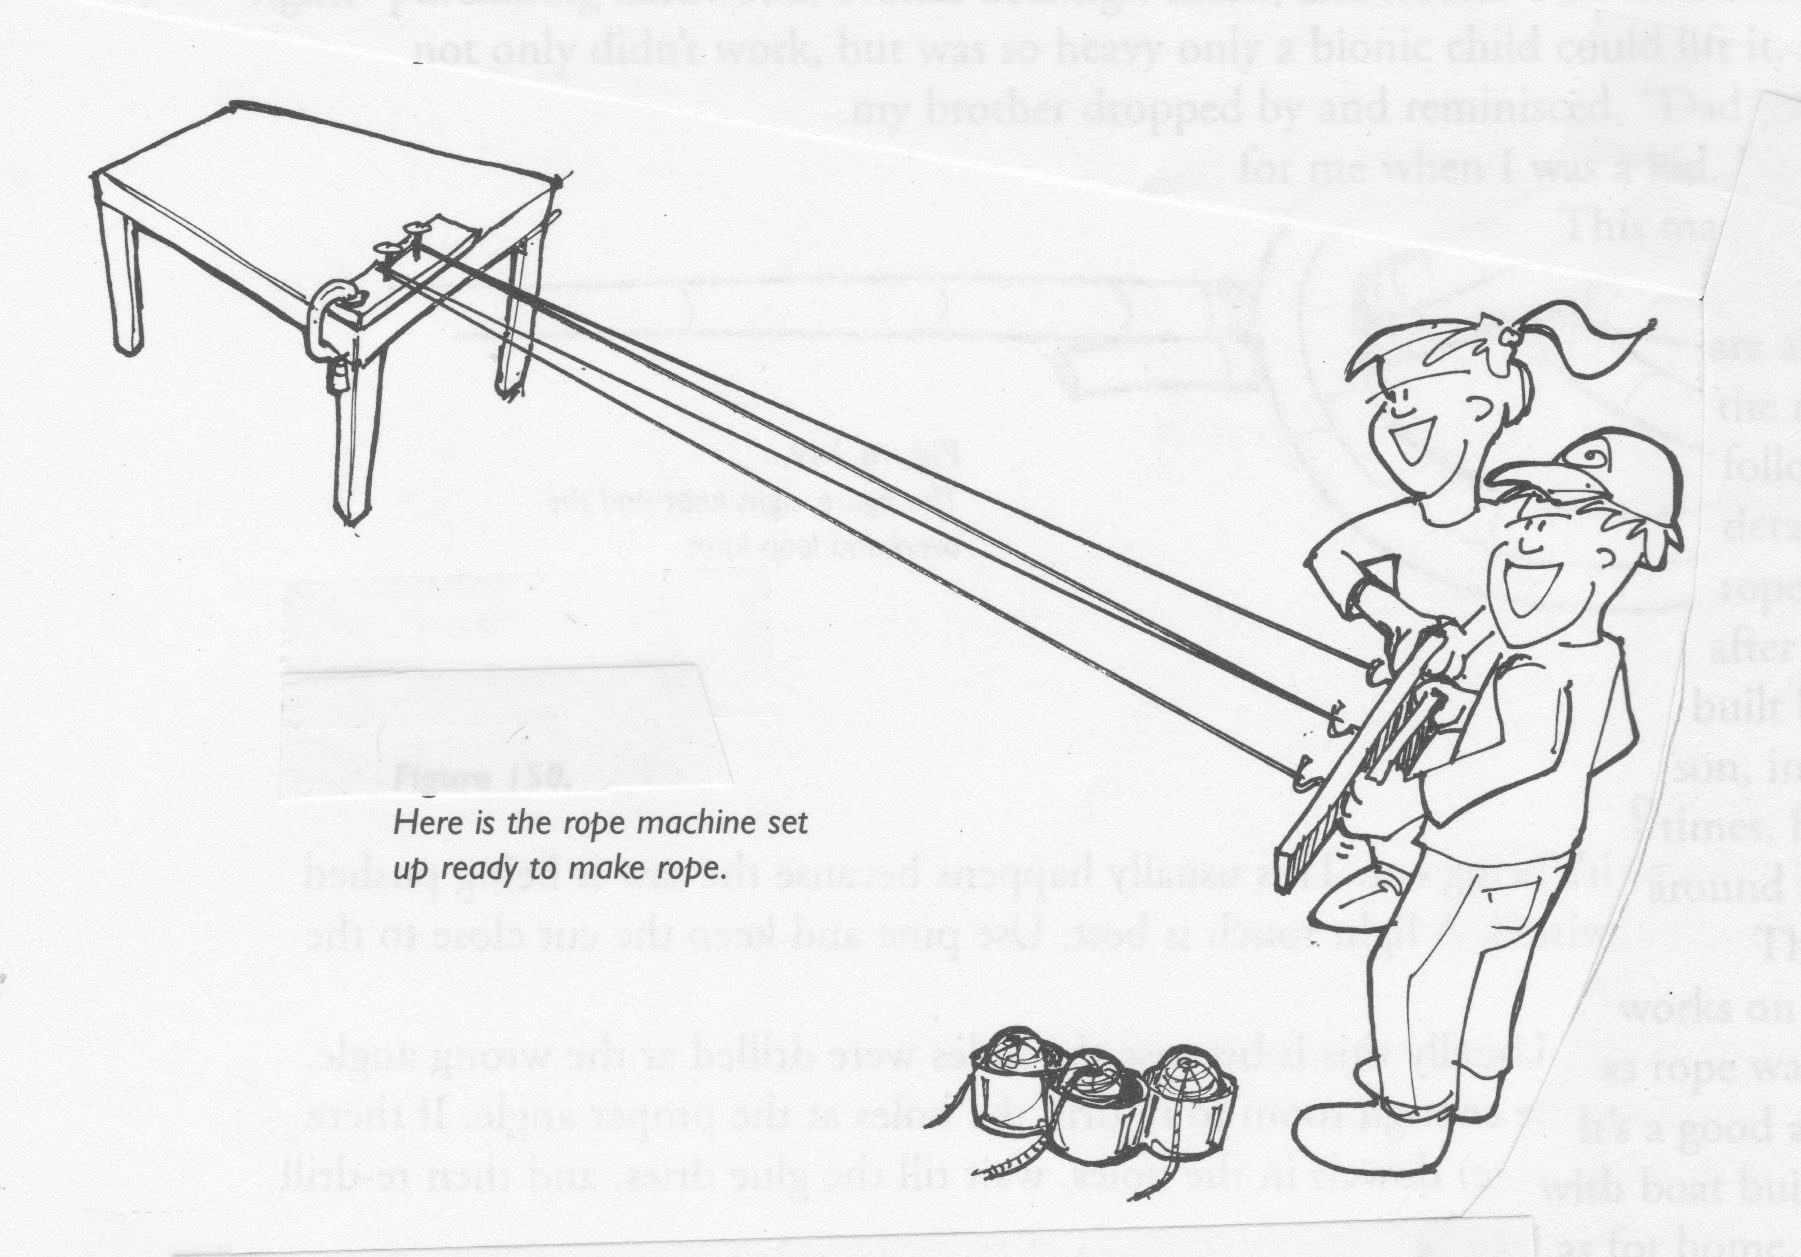
Here is the rope machine set up and ready to make rope.
Materials
- Three feet of 1 X 2
- A wire coat hanger or equivalent wire
- Two big nails about 3: long
- 4” X 6” piece of wood for the “anchor”
- sandpaper for smoothing up the corners of the 1 X 2
- At least three skeins of yarn and three coffee cans or oatmeal boxes to hold the yarn and keep it separate.
Tools
- a small hand saw to cut the 1X 2
- a hand drill and 1/8” bit to drill the holes for the hooks
- two pair of pliers, one long nose for bending the hooks
- a surform plane or rasp to round the corners of the 1 X 2 is nice but not absolutely necessary
- sandpaper to smooth up the 1 X 2. Kids can do this.
- a file for removing the sharp ends of the coat hanger or wire
- a small C clamp to clamp the anchor to a table
Some of the 8-12 year old kids in my woodworking class liked making rope so much they built their own rope machine. The plans are also in my Woodshop for Kids book. I had to help the younger kids with bending the hooks but they did the rest themselves.
CONSTRUCTION
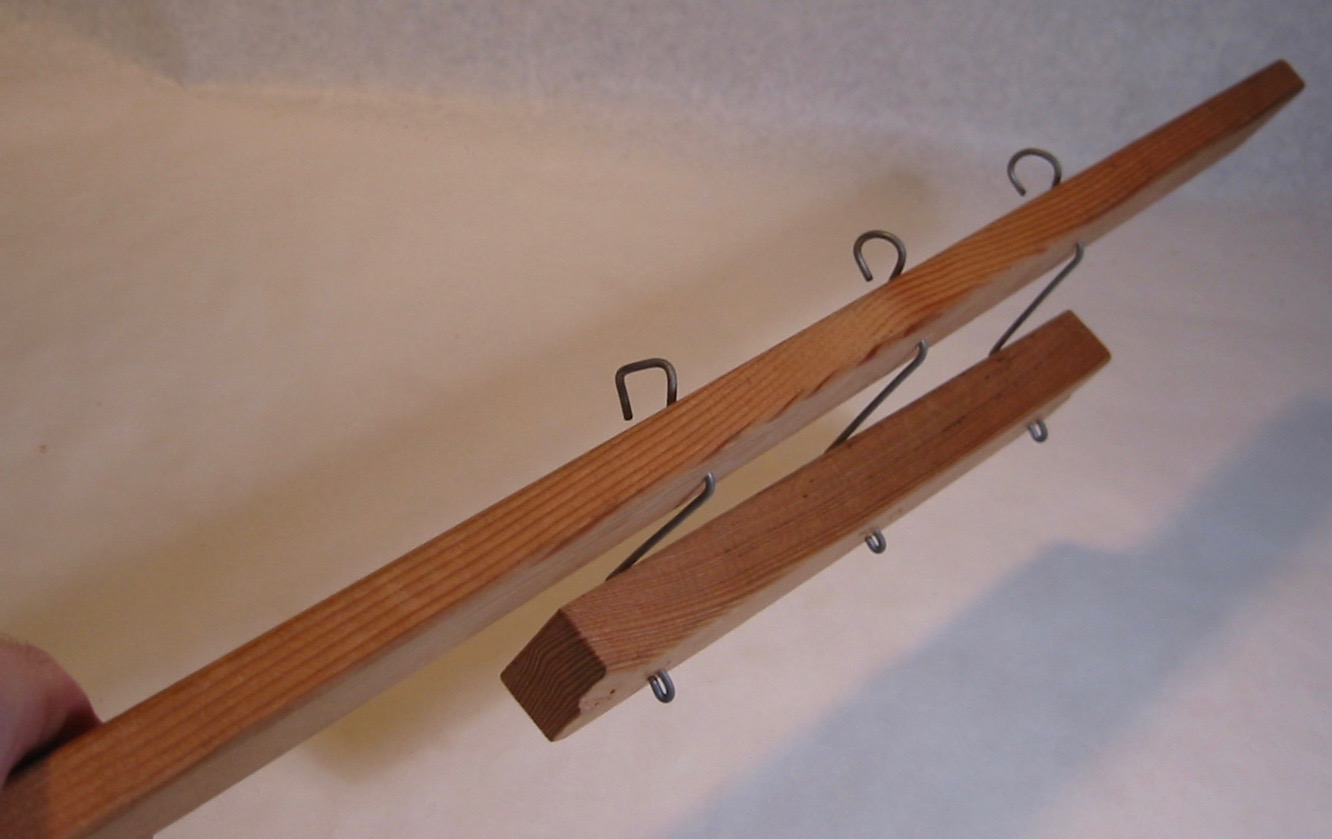
The rope machine is made up of a handle (the long piece), a crank (the short piece) and three wire hooks. The crank turns the three wire hooks. Each hook twists a separate bundle of yarns. After the bundles are tightly twisted, they’re drawn through two nails (the anchor) and allowed to unwind. As they unwind, the separate bundles twist together and make one strand of rope. Its an interesting process and in tall ship days they had rope walks ¼ mile long.
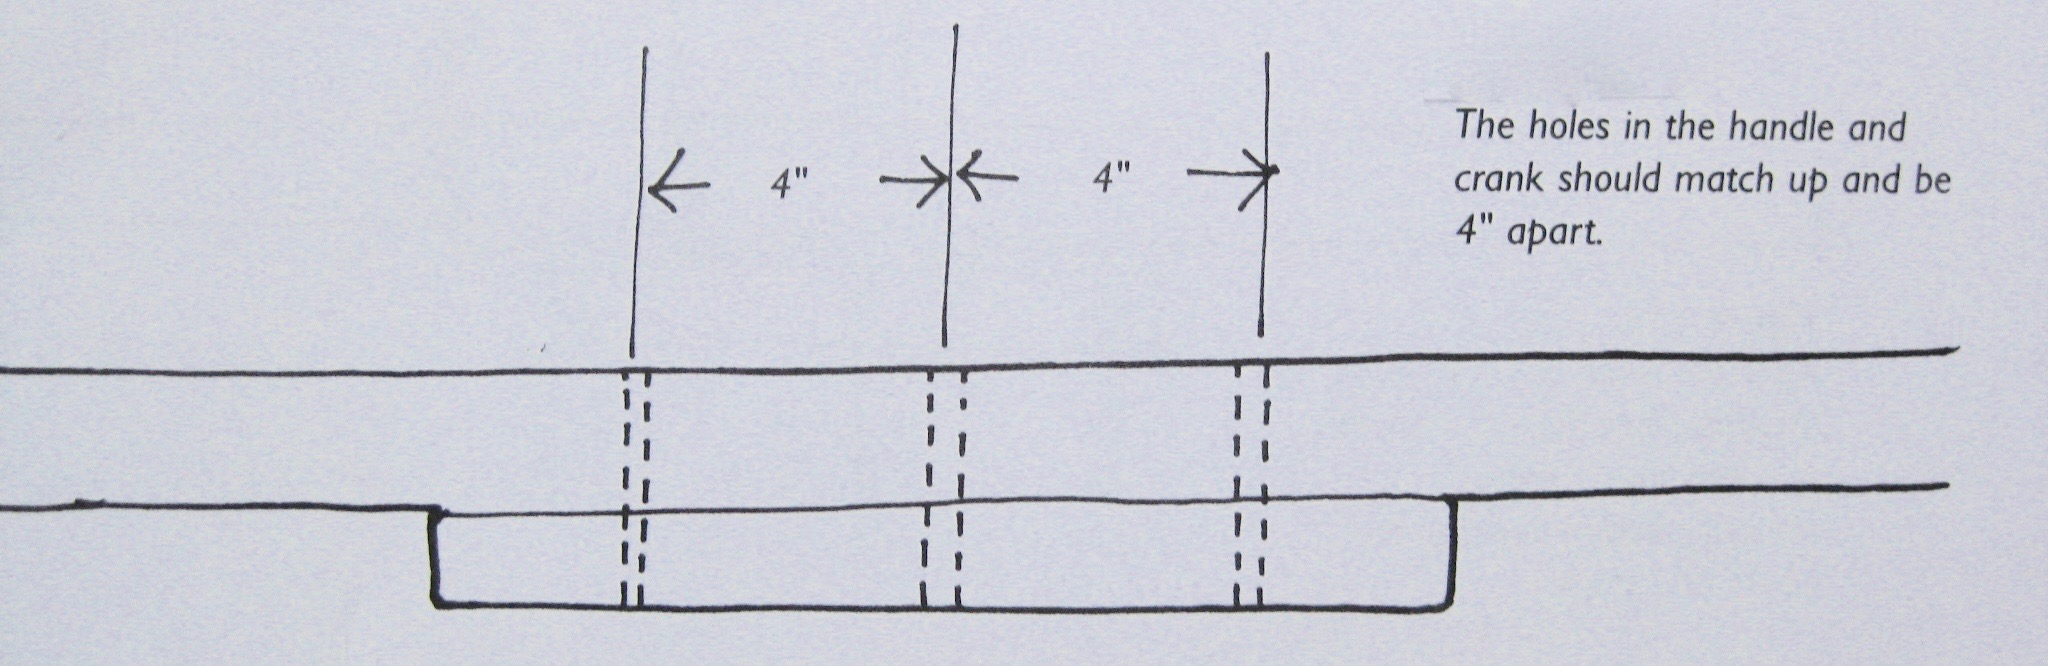
Make the handle about 26″ long. Round edges and corners with Surform and smooth up with sandpaper. Make the crank about 10” long. If you have 5/4” (thicker than 1 X 2) for this it will be a little easier to hold. as the crank is turned. Smooth and sand the handle and crank. Lay out the location of the three holes in the handle. The holes should start about 5″ from the end, and be 4″ apart. Drill the holes using an 1/8″ bit. Make sure the holes are drilled as straight as possible. If you have access to a drill press you can fasten the handle and crank together and drill through both at the same time.
- The holes in the crank are next. They must match the holes in the handle. Place the crank on the handle. Center it over the holes, and clamp it in place. Mark the hole positions in the crank by poking a nail through the already drilled holes (in the handle) and tapping it a couple times. Separate the crank and handle and drill the holes.
- Drill the holes using an 1/8″ bit. Make sure the holes are drilled as straight as possible. If you have access to a drill press you can fasten the handle and crank together and drill through both at the same time.
- Cut three 8″ wires for the hook/turning mechanisms. Smooth the jagged ends with a file.
- Make a jig to insure the bends in three wires come out with the same dimensions. The jig is just three nails set in three corners of a 2″ square on a piece of scrap wood.
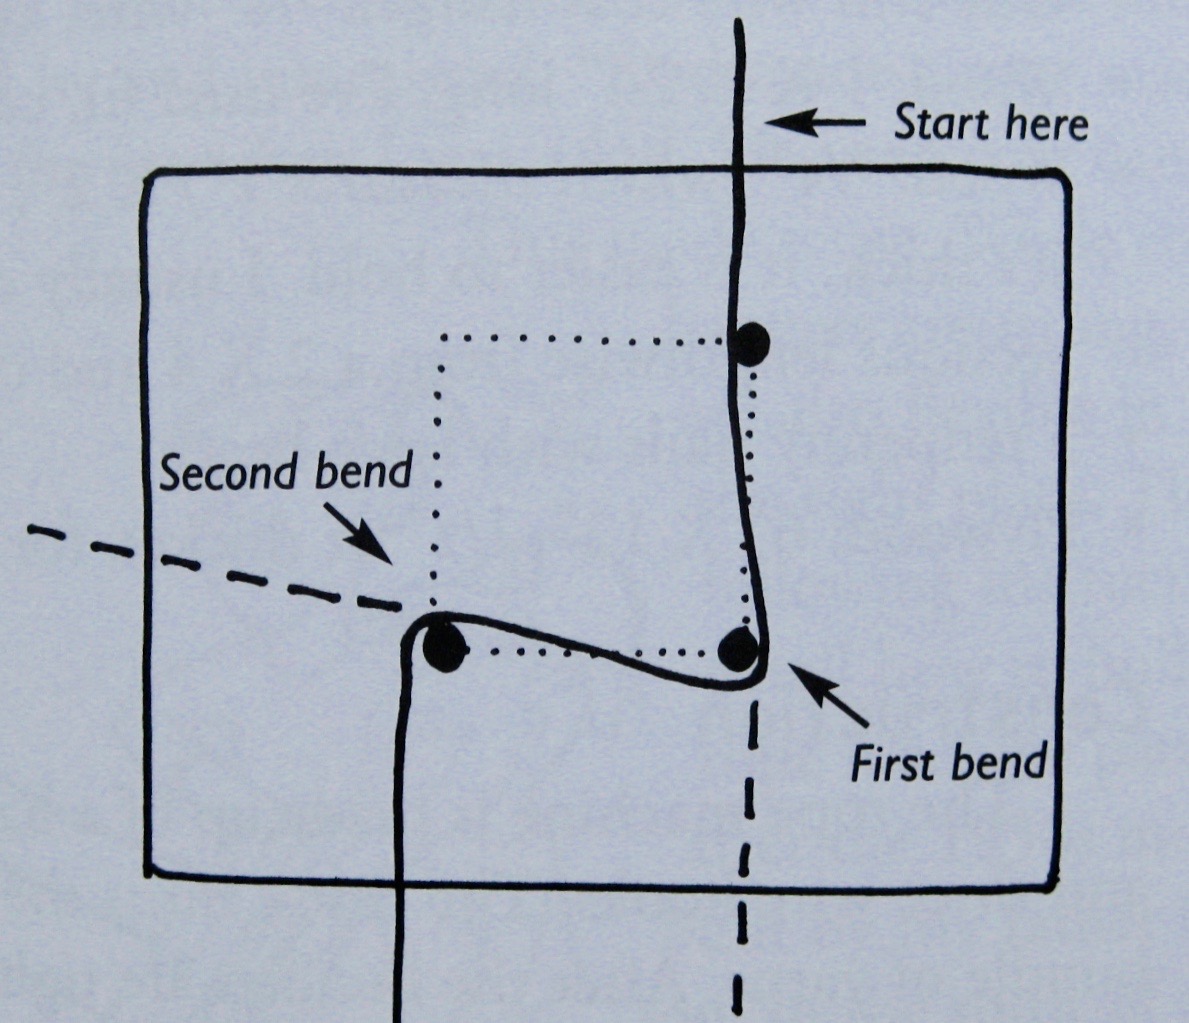
Bend the wire. I usually do the first wire, and let kids try the others. Lay the 8″ wire in the jig as shown in (above). The top end of the wire should start near the top edge of the board. Then make the first and second bends sharply around the nails. Remove the wire from the jig, and gently correct the bends to a 90 degree angle.
5. Assemble the crank, the handle, and the wires (below).
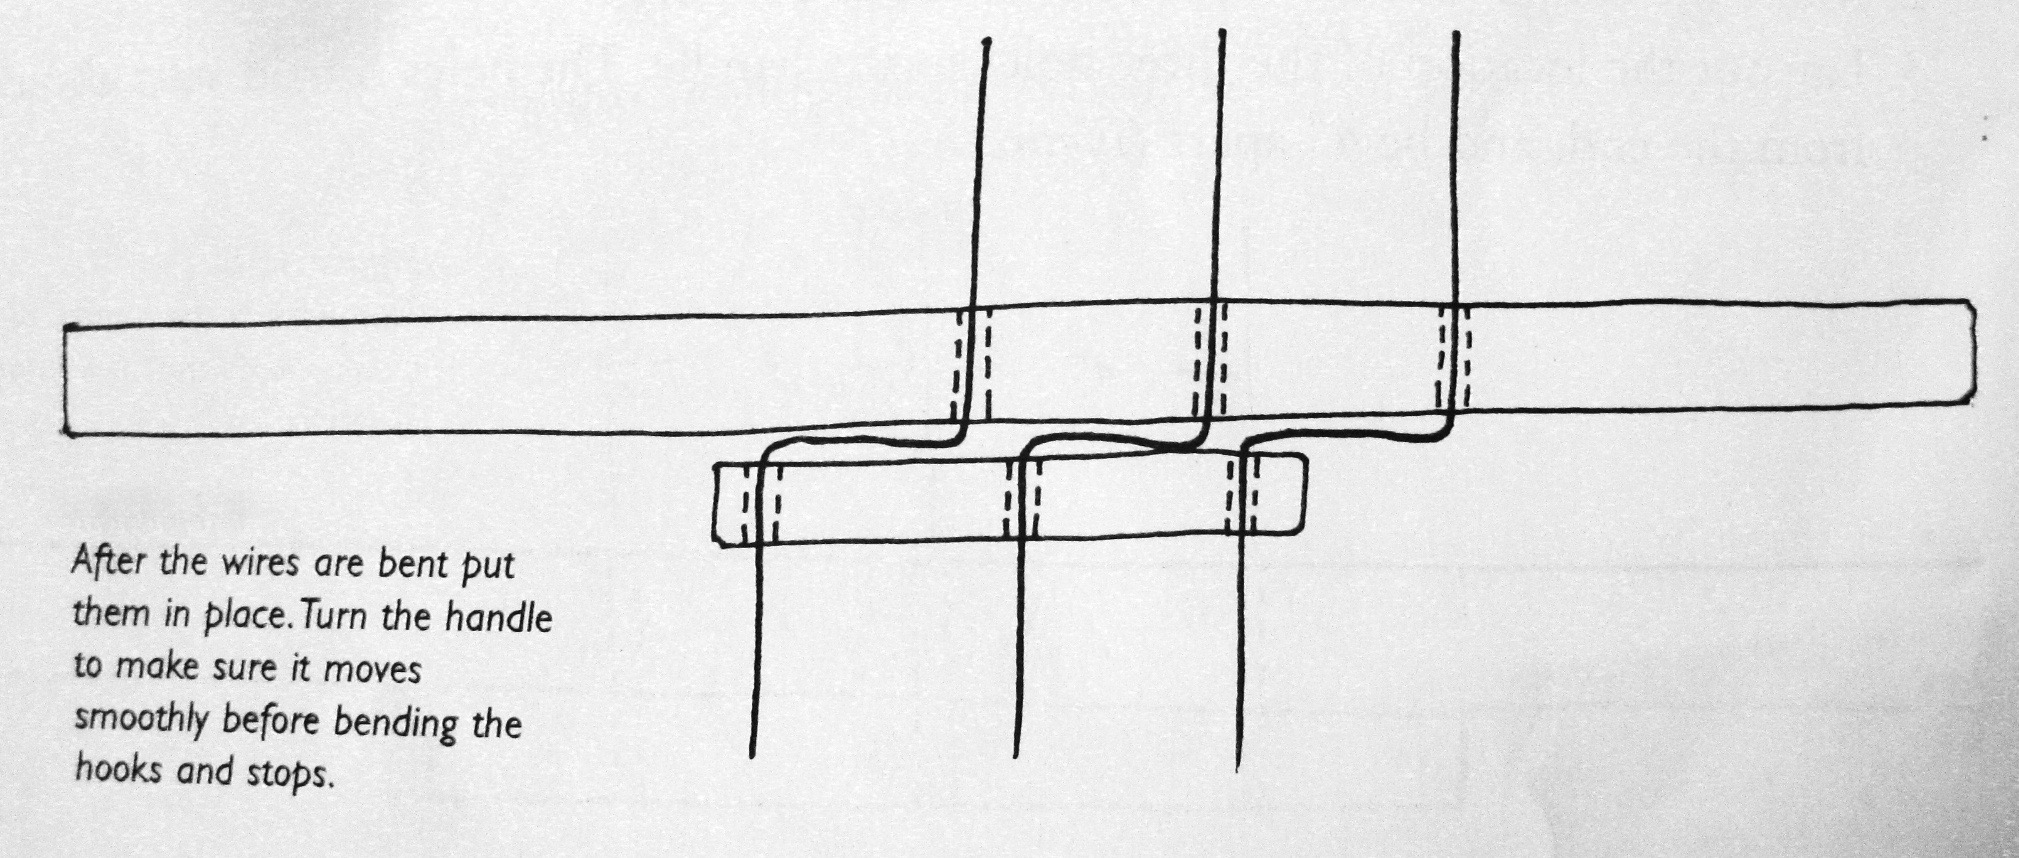
Install the long end of one wire into each hole on the handle. Slide the crank over the shorter end of the wires. Before bending the hooks and stops, (the next step) hold the handle and turn the crank. It should rotate smoothly. The flexibility of the wire should compensate for the holes being a bit off or the wires not being quite the same. If the handle doesn’t rotate freely, go back and figure out why. Are one of the holes at a weird angle? Are one of the wires noticeably different from the others? Are the distances between the holes different? Once the crank will turn freely, go on to the next step.
6. Bend the wires so there will be hooks sticking out of the handle and stops on the back of the crank to keep it from falling off. The stop on the back of the crank has two 90 degree bends. The hook on the handle side is a 45 degree
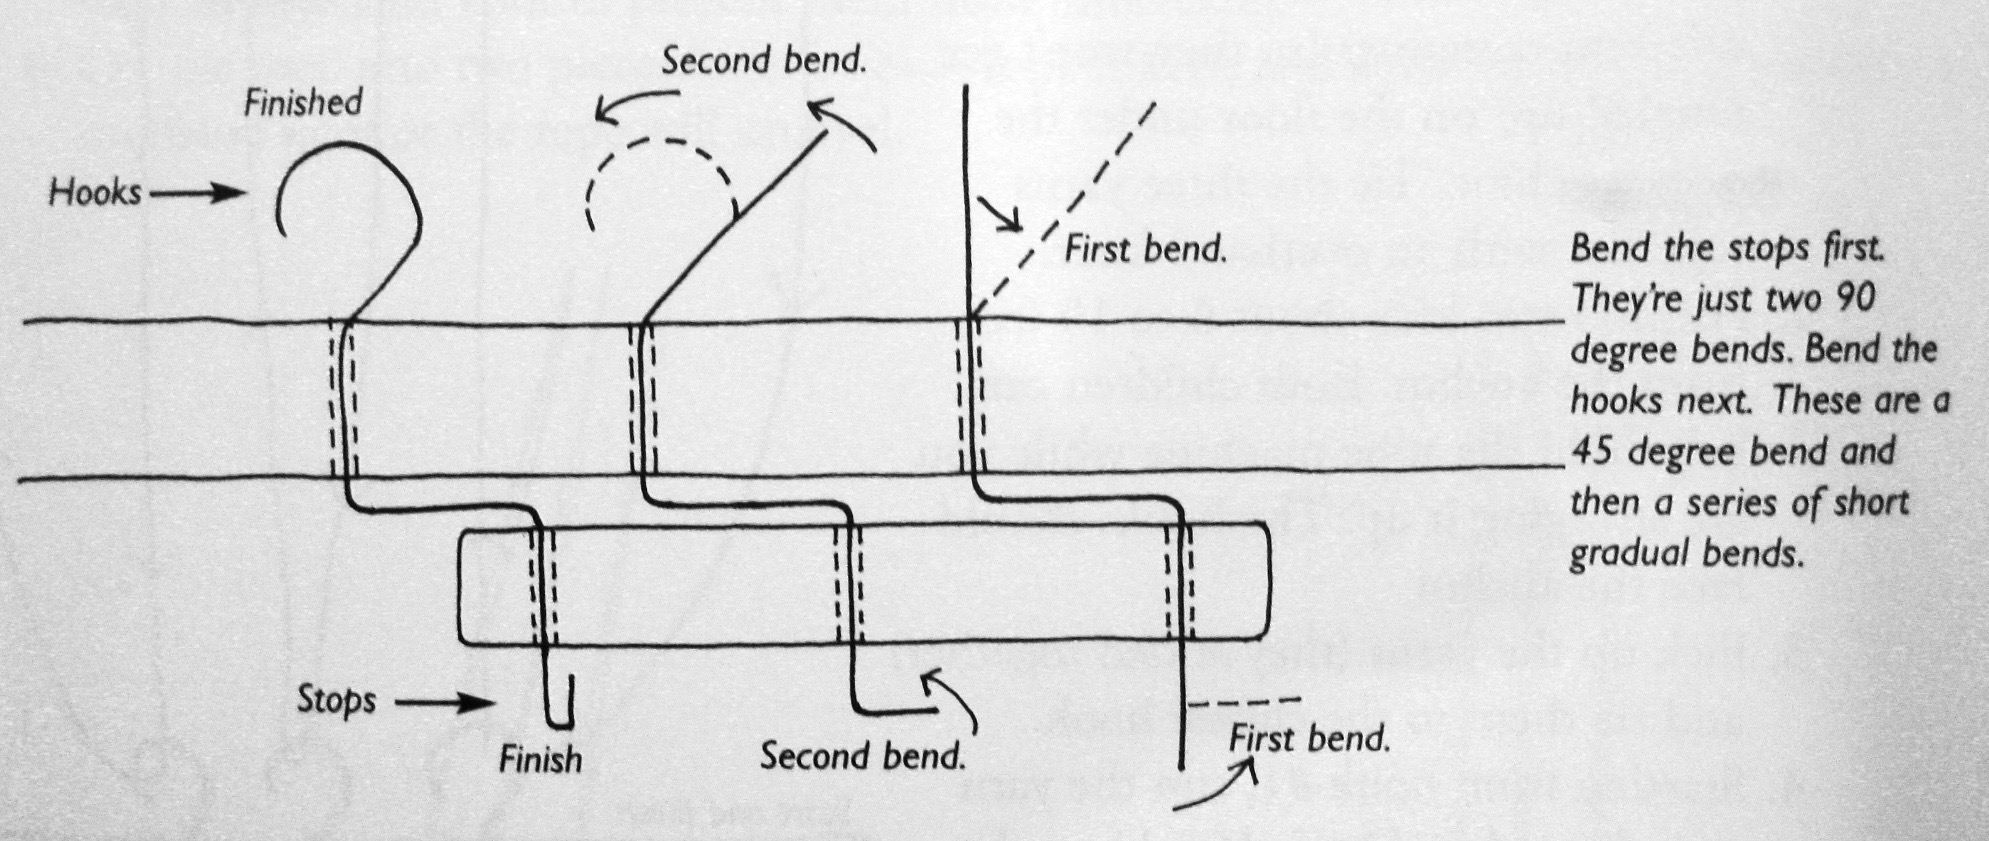
bend and then a series of short bends to make something resembling a hook. I use two pair of pliers. Again, I’ll demonstrate how to do the first wire and let the student try the other two.
Use two nails of the bending jig for the “anchor”. The purpose of the anchor is to hold the other end of the yarn as it is being twisted by the rope machine.
USING THE ROPE MACHINE
Making rope takes two people. One cranks the rope machine and the other pulls the rope out after the yarn is twisted. When making rope for the first time, an adult will probably need to string the machine and demonstrate how to pull the completed rope through the anchor.
MAKING ROPE
- Clamp the anchor to a tabletop. Have the kids choose three different colored yarns. Put each skein of yarn in a different container (so they won’t get tangled up) on the floor under the rope machine. Tie the three yarns together with an overhand knot.
- Position two kids a few feet away from the anchor. Both children can help hold the rope machine while you are stringing it up. The hooks should face the anchor.
- Pick up the yarns (after they’re tied together) and tie them to the closest hook.
- Starting from hook on the bottom, run the yarn as indicated below.

Have the kids keep a bit of tension on the rope machine and hold it parallel to the anchor.
5. After you have passed the yarn around the top hook , run it back around both anchor nails (as if they were one) and back to your starting point, the bottom hook. Cut and tie it to the hook. You are ready to make rope!
CRANKING
Start cranking clockwise and continue in the same direction. Keep an even tension on the yarn. As the yarn twists tighter, the operator has to move slowly toward the anchor while still keeping tension on the yarn. Once the three strands have a tight twist and before the twisted strands begin to kink, stop cranking and go on to the next step.
DRAWING OUT THE ROPE
- Insert your fingers behind the nails (below) and pull the rope toward you
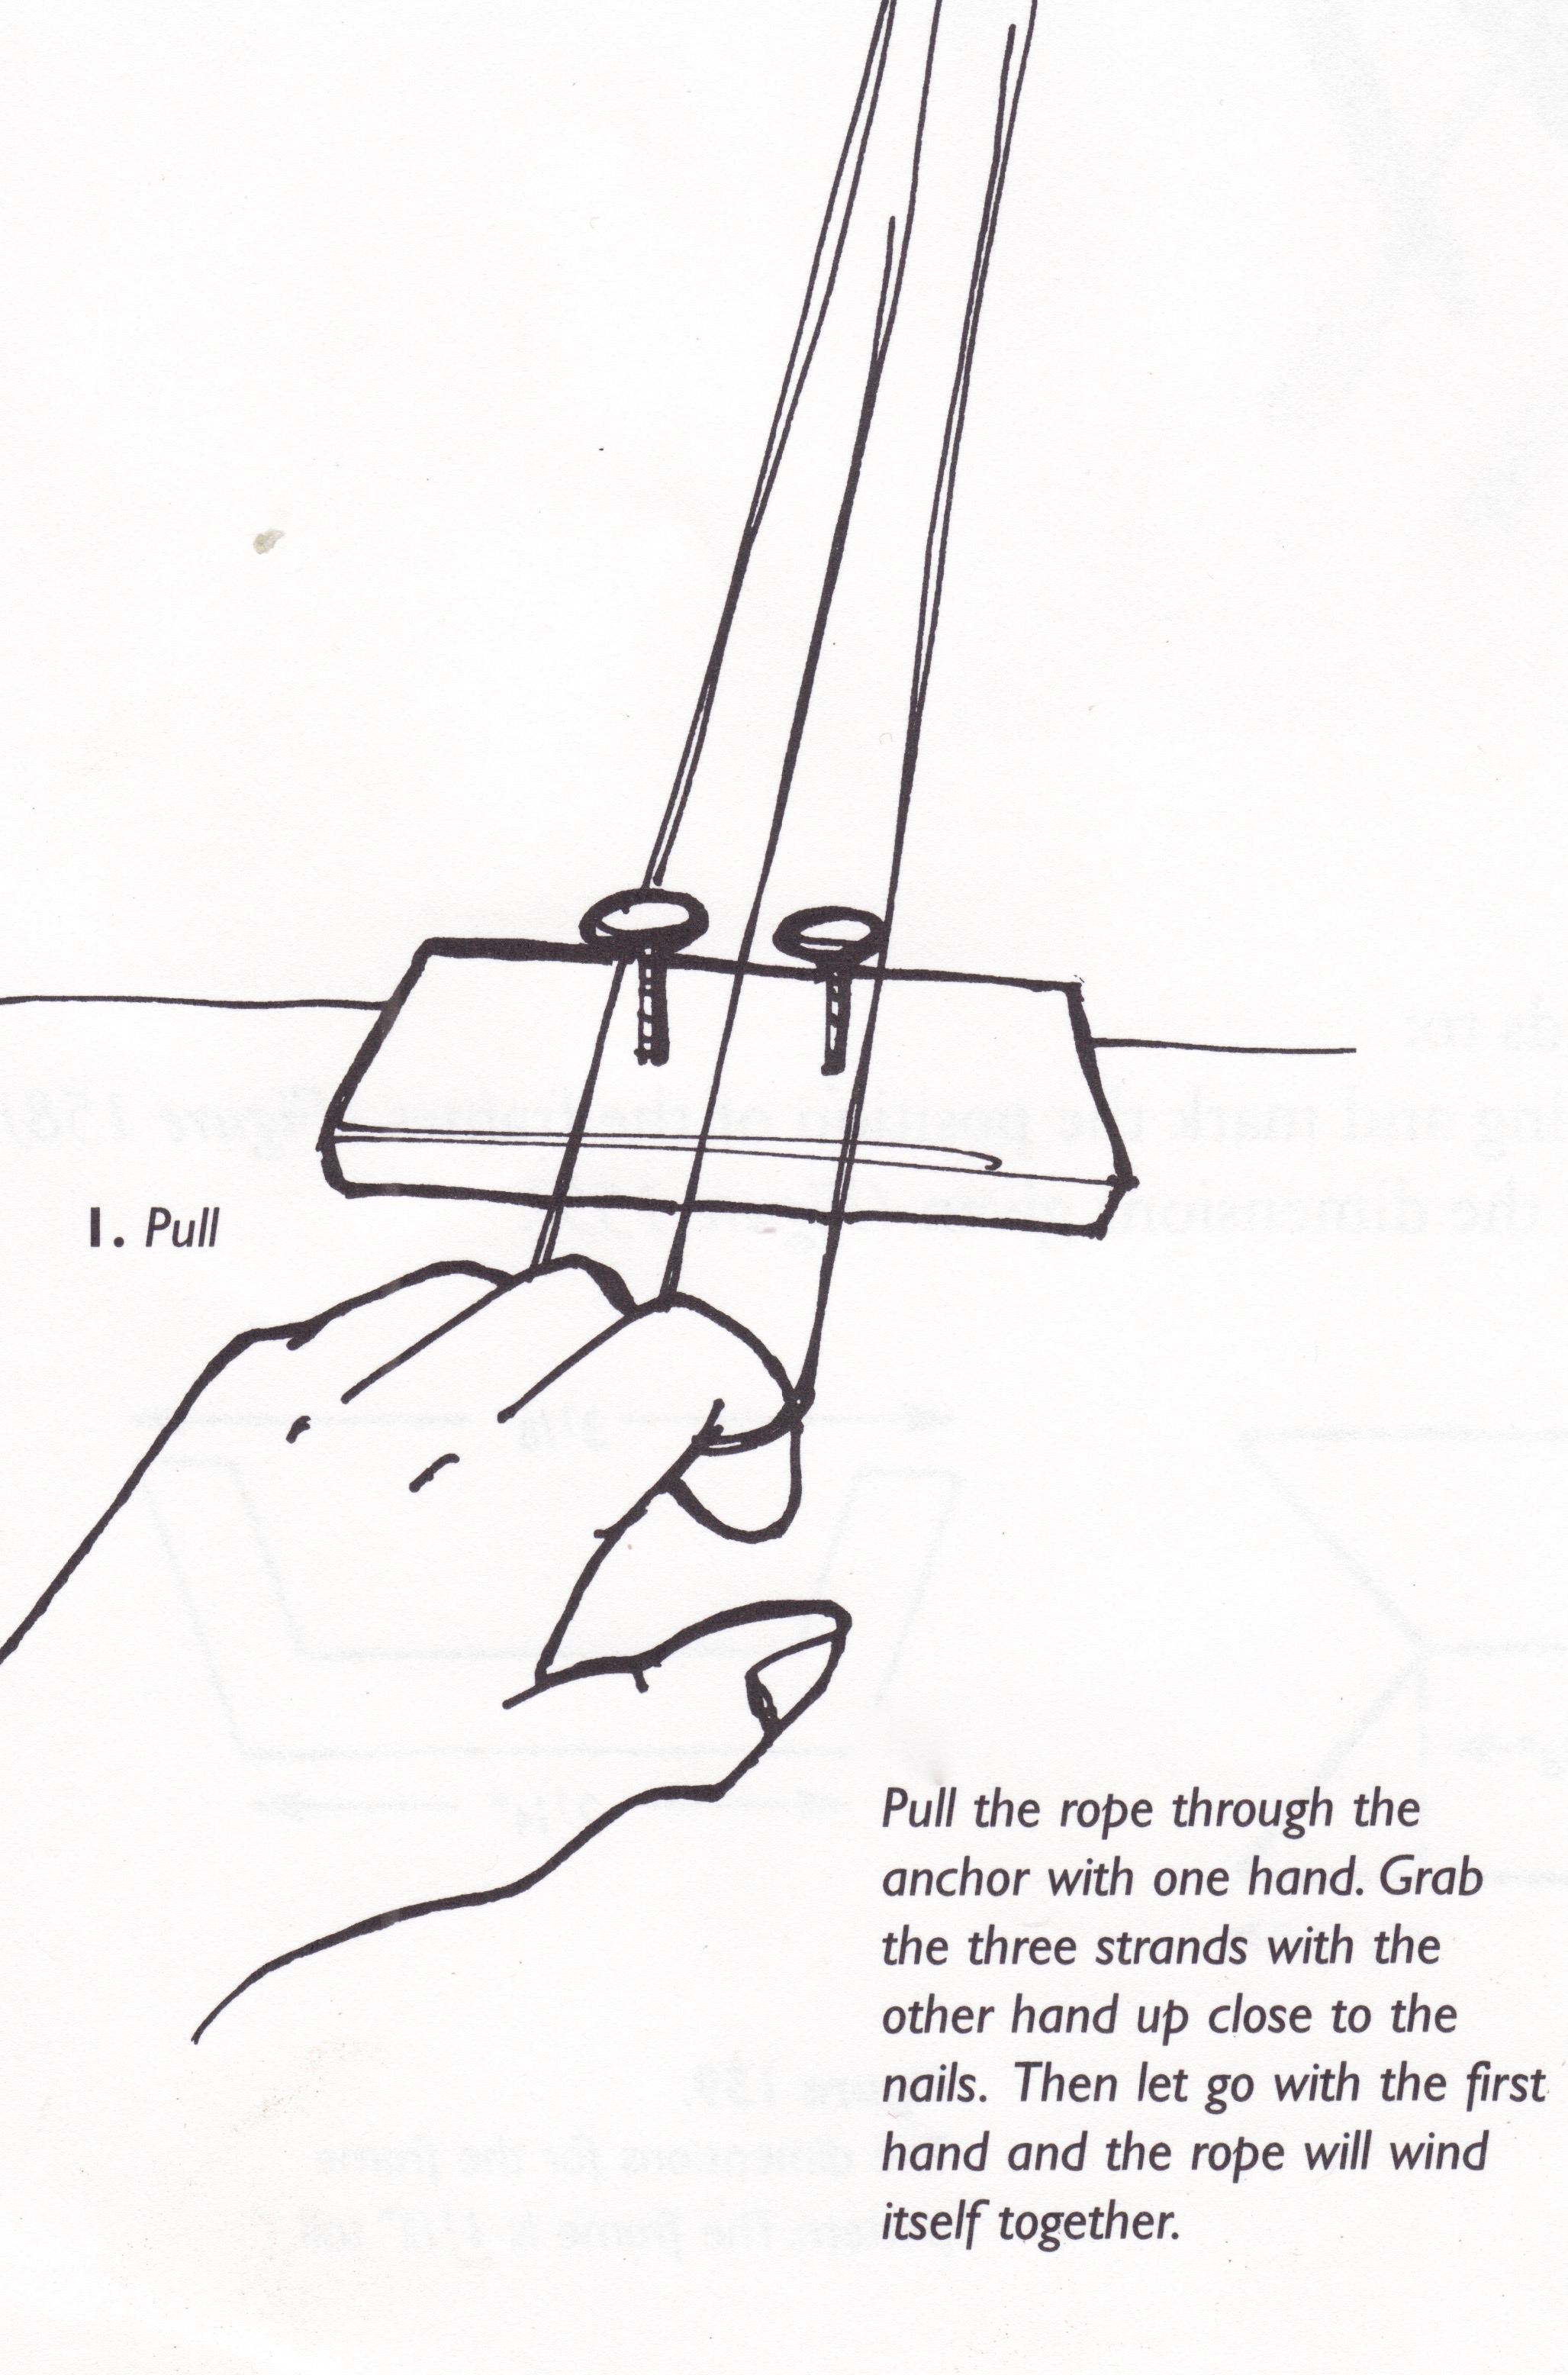
- After you have pulled the rope out about a foot (left hand), pinch it off with your other hand just behind the nails with the right hand and let go of the rope with the left. So its: Pull (left), grab (right),and let go (left).
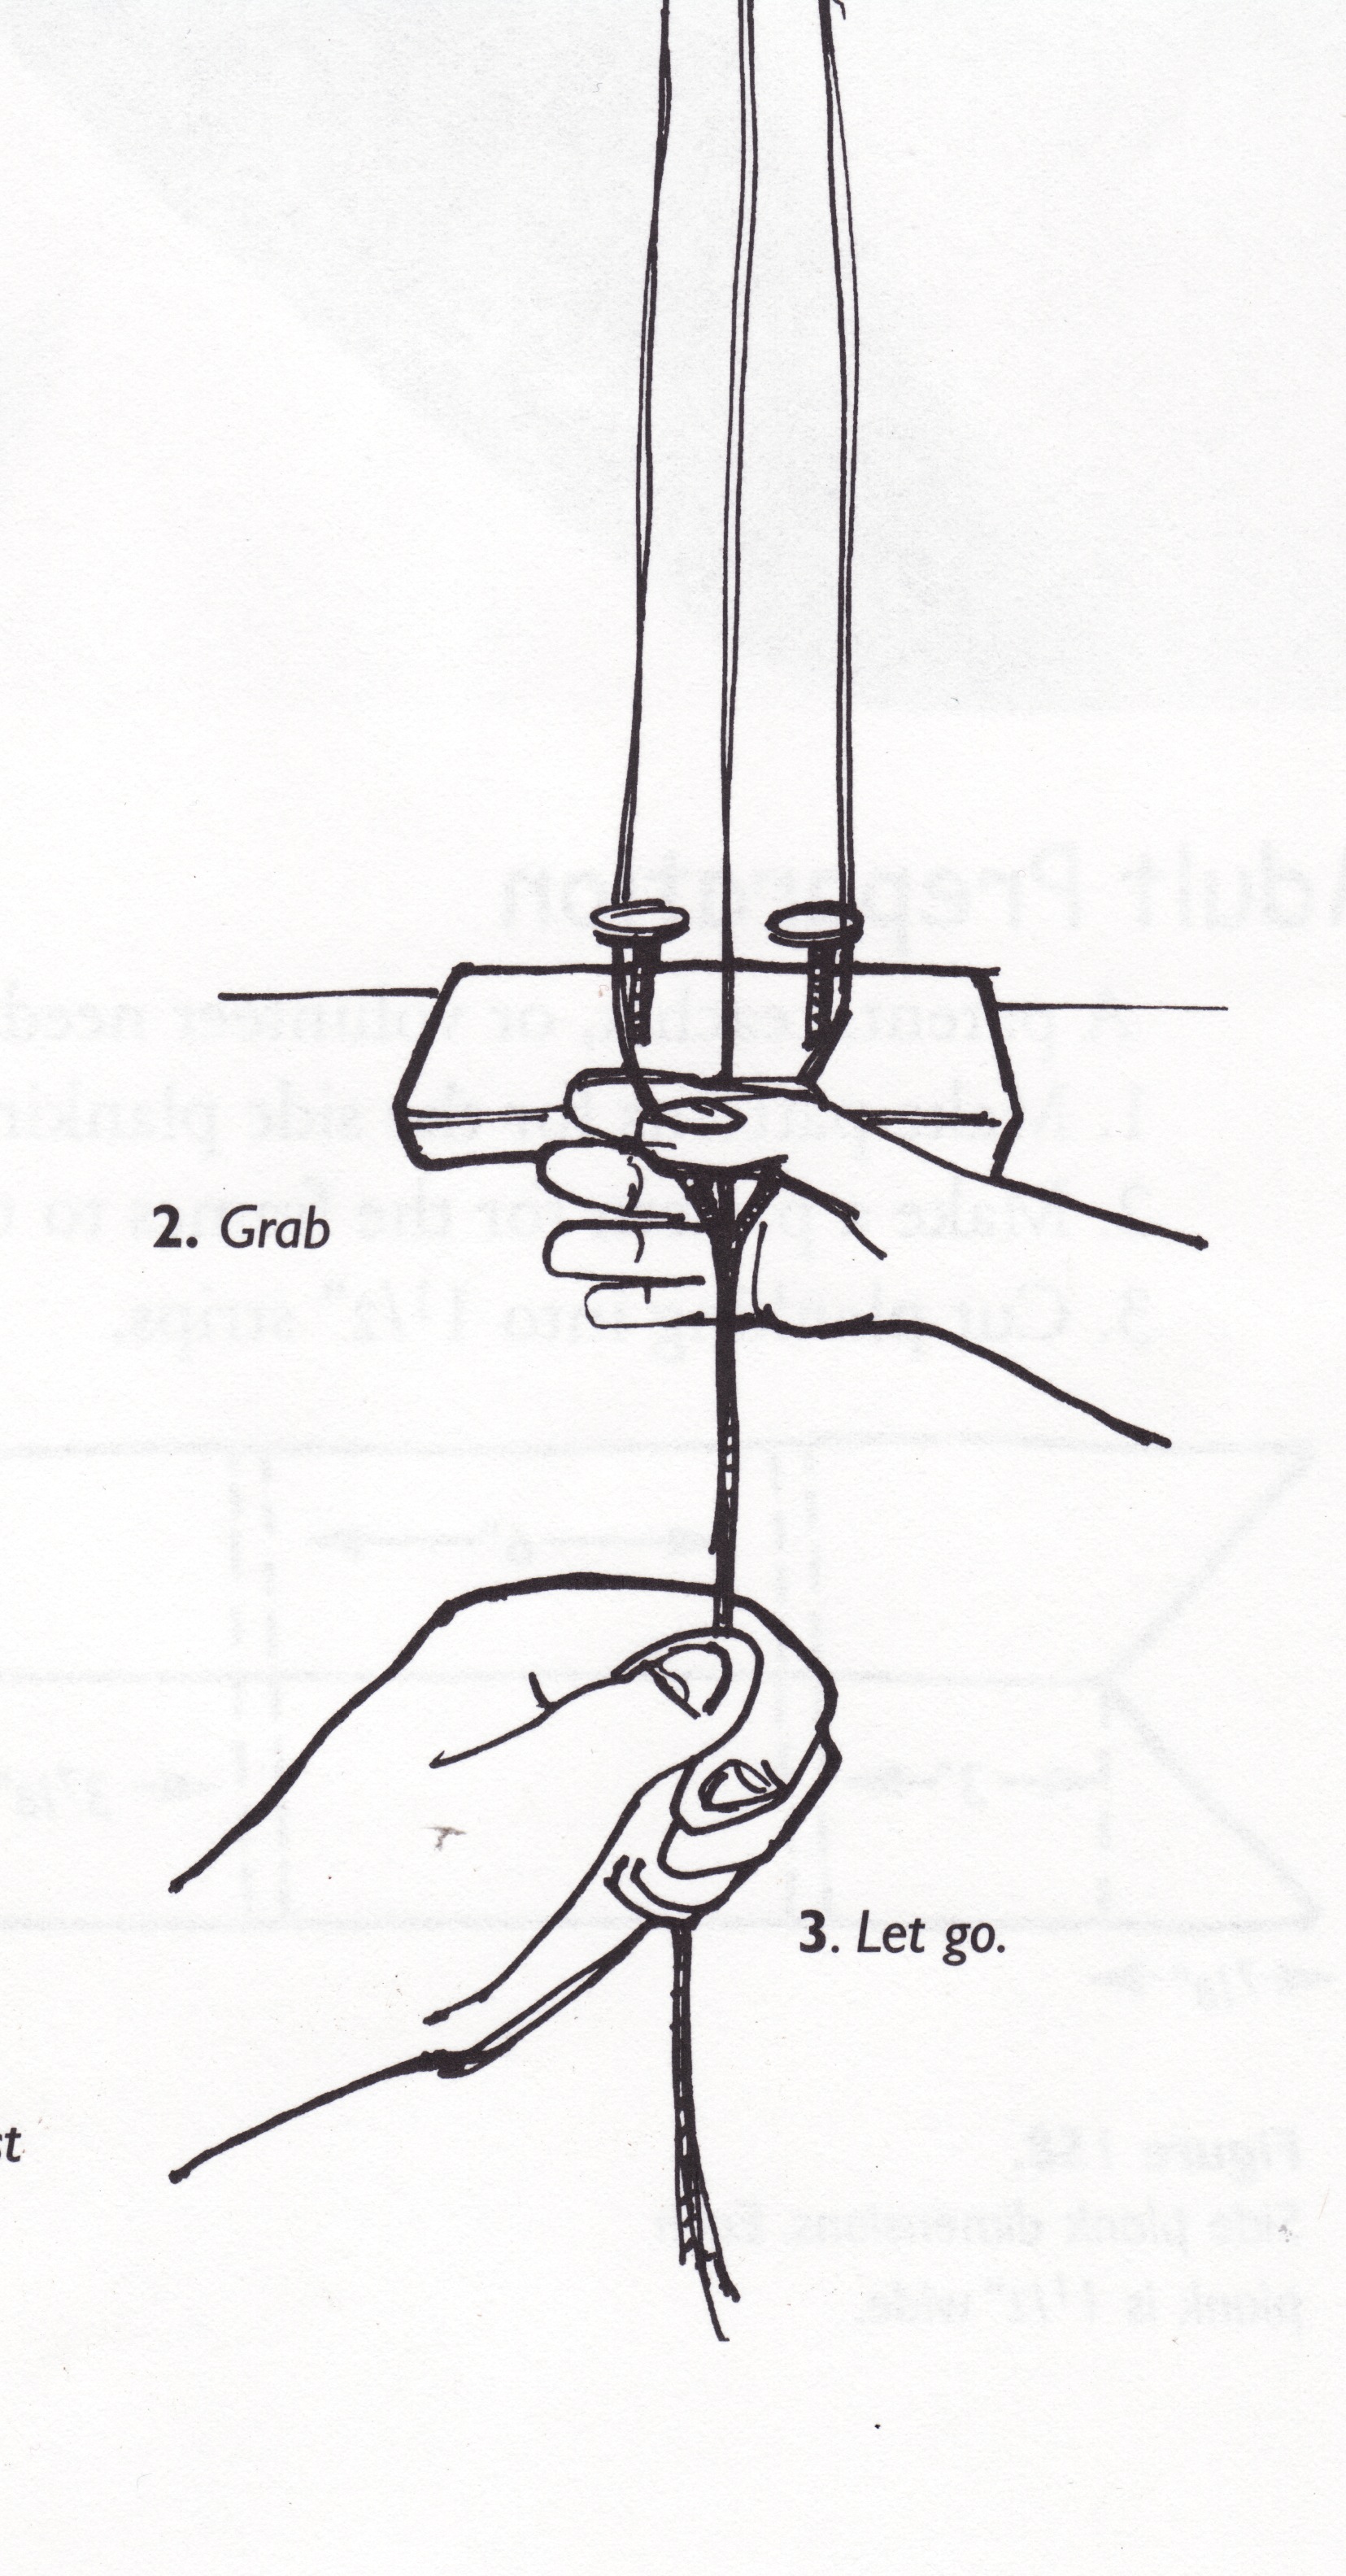
- As you pull the rope out, your helper holding onto the crank must walk slowly forward, maintaining a light even tension on the yarn. Kids catch on quickly with practice.
- After all the rope has been drawn out, slip the yarn off the hooks. Tie the ends together with an overhand knot to prevent them from unraveling.
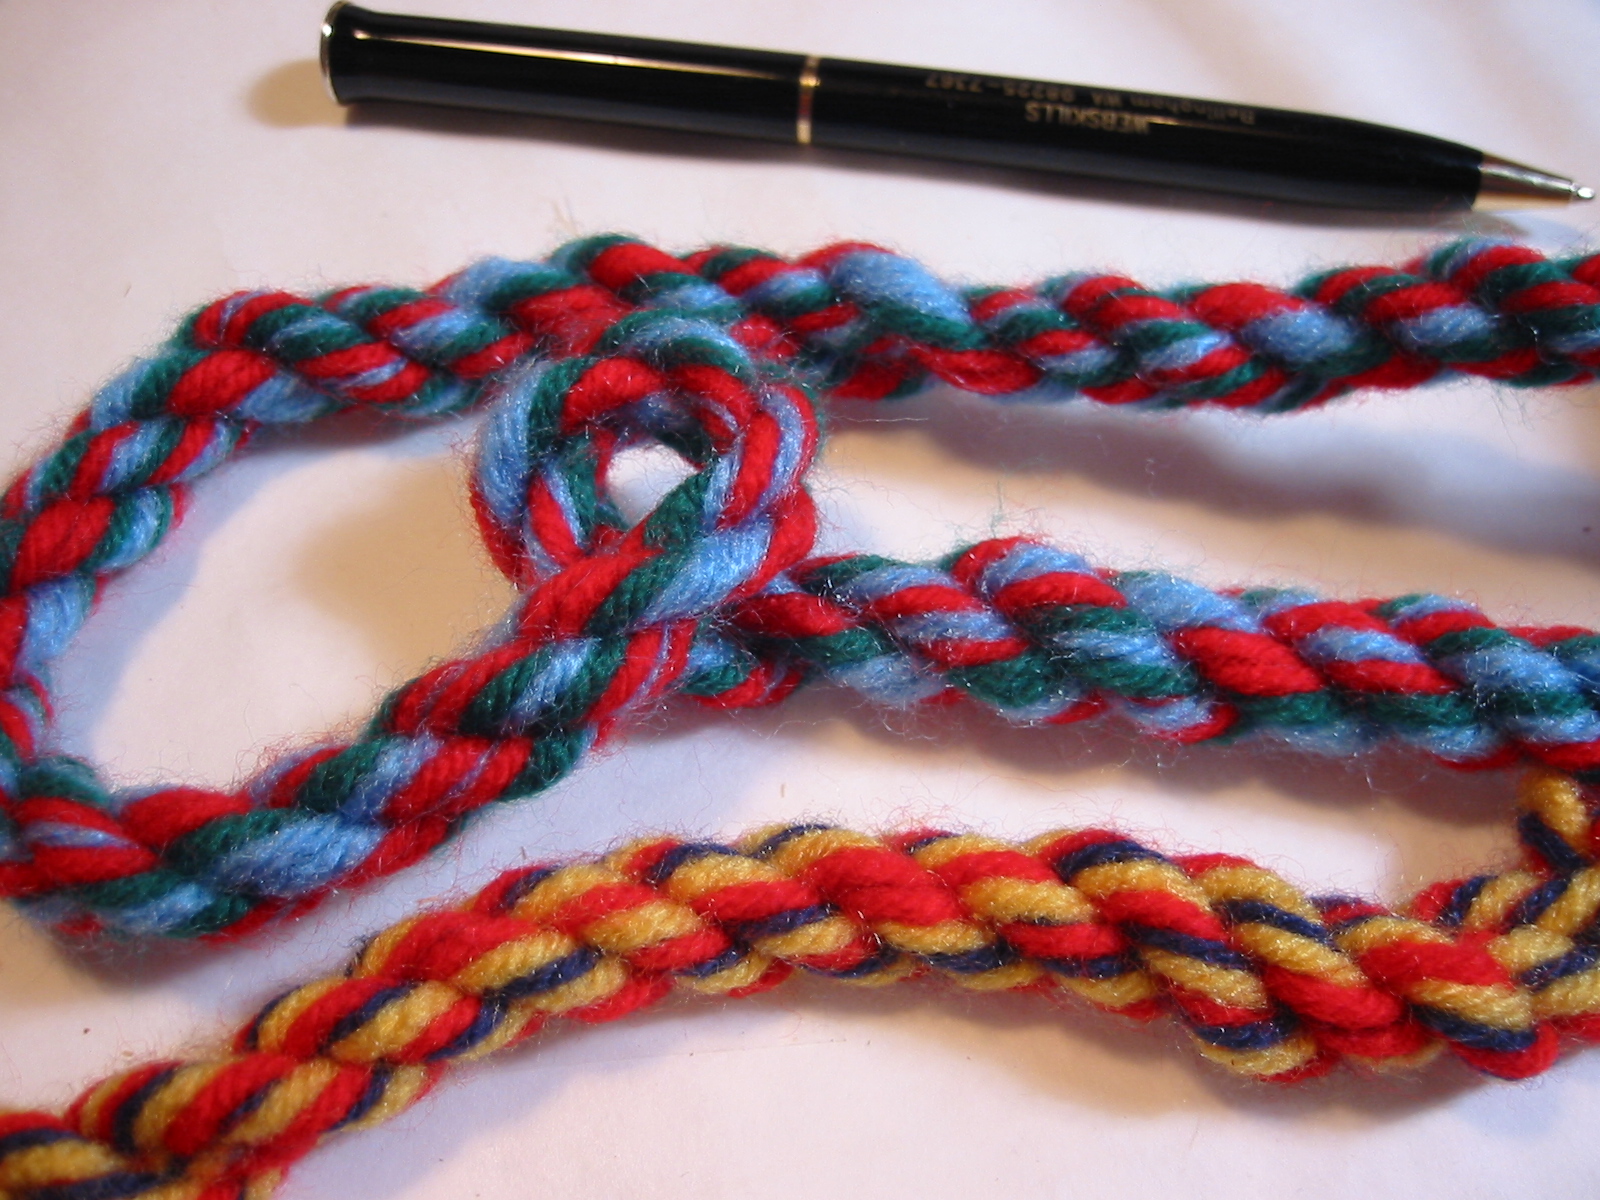
- Cut the rope into two pieces, one for each rope maker, and again tie off the ends with an overhand knot or the rope will unravel. Find some kids and give it a try, you will be glad you did.
*******
Please inform me how you made multicolored ropes. I did it years ago on an antique machine but have to do it on a more modern one in the near future.
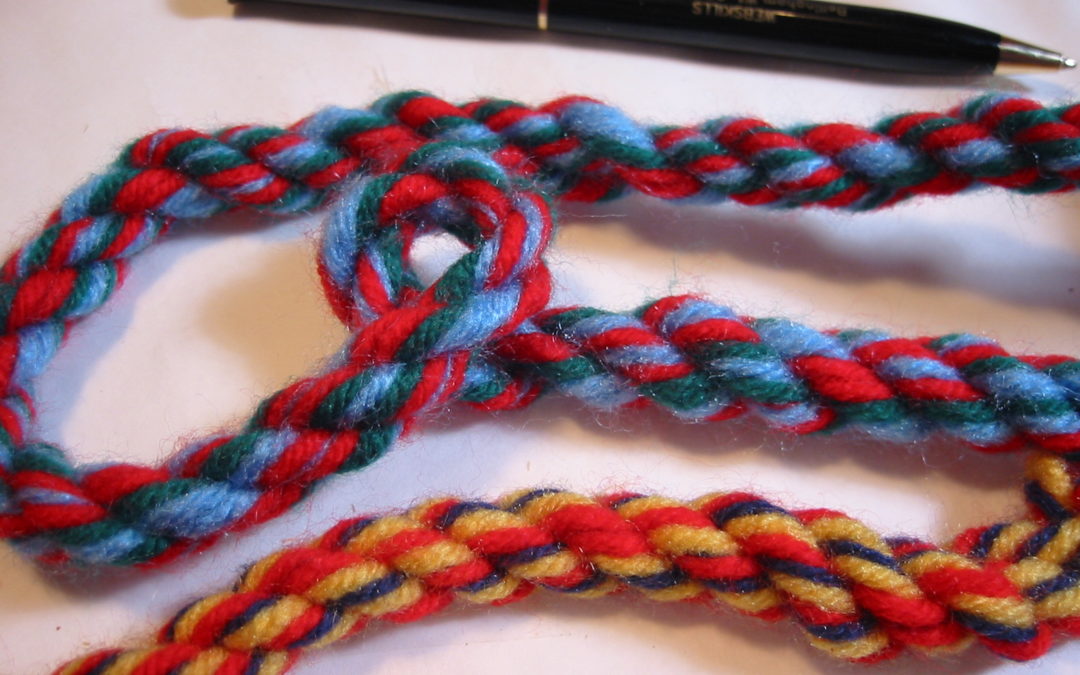
Take three (or more) different colors of yarn and put them in separate coffee cans. Take the end of each color yarn and tie them together with an overhand knot. String the combined yarns together in the method explained in the article. When you turn the rope machine it twists all the colors together resulting in multi colored rope.
Can you down load rope making peints on PDF? However, I would like to see a more sofisticated rope making machine than the one you have displayed on your site. Thank you so much
Sincerely,
ANGUS A. STEVENS
PS: Please tell me your price on the PDF prints or whatever you have on hand?
The plans that I have are in the article I posted. You should be able to copy and paste them. They are also in my Woodshop for Kids book.
I have no plans for more complicated rope machines.